How to access your servers IPMI/KVM
Last Updated: August 21, 2025
All of our dedicated servers (managed or unmanaged) come with the ability to utilize IPMI/KVM to access your server in the event that other normal methods don’t work (such as SSH).
IPMI or Intelligent Platform Management Interface is useful in the event of several server-related events.
Events as:
- Network unresponsive
- SSH not available
- Finalizing an installation
- Resetting root password
- Accessing BIOS settings
There are two variations of KVM Access that our Dedicated Servers use. This is a difference of newer vs older hardware.
- Newer (managed) utilize HTML5 KVM
- Older (unmanaged) are restricted to the KVM Java Applet
We’ll be going over how to access both in this article.
Accessing HTML5 KVM
As briefly mentioned, a non-budget dedicated server is going to be utilizing newer hardware which allows for IPMI to utilize the HTML5 KVM tool. This tool is accessible via the KnownHost Dedi Management Panel.
In order to access you’ll need to be logged into your Dedi. Server Management Panel. This article assumes that How to Access the Dedi Management Panel has been read and you’re familiar how to login.
Once you’re within your panel, you’ll want to manage the server you wish to access IPMI/KVM for by clicking the “manage” button beside the server.
We only have one here, so we’ll use this one.

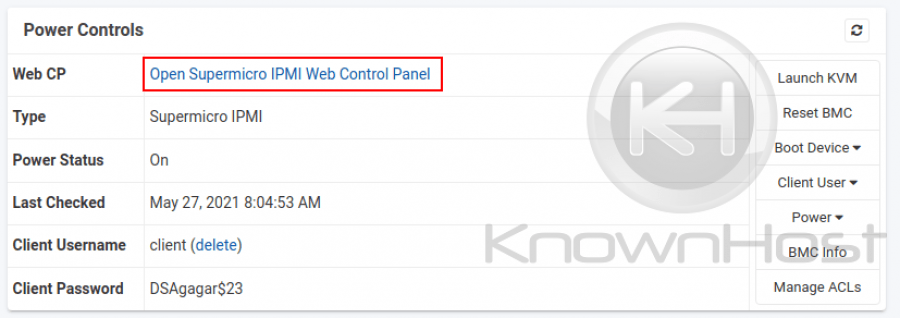
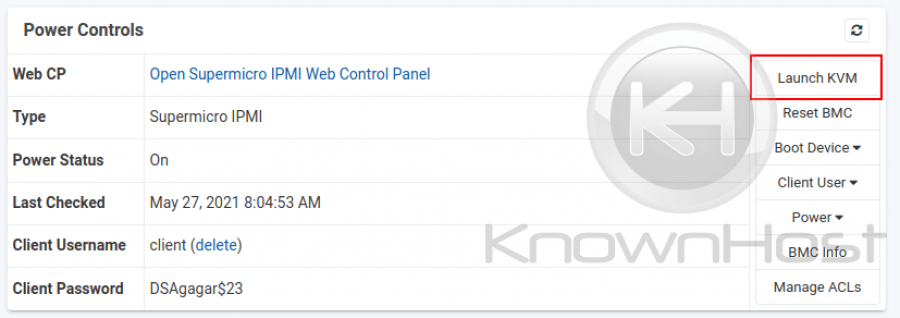
Once you’re on the next page within this management interface for your selected server, you’ll want to scroll down to the “Power Control” section that shows as such.
We’ve clipped this to only show the “Power Controls” section.
Within this section, you’ll want to take note of your “Client Username” and “Client Password” as you’ll need these for the upcoming section.
To access the IPMI/KVM; you’ll want to click the “Open SuperMicro IPMI Web Control Panel” URL which will connect you to your servers IPMI service.
This will open a new browser page that’ll provide you with the SuperMicro login screen for your servers IPMI service.
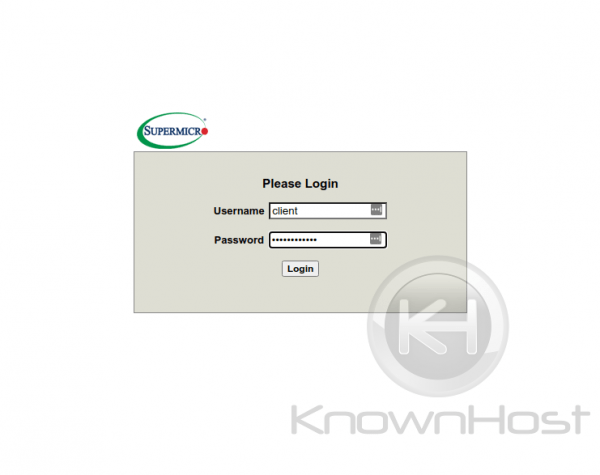
Now that you’re logged in, you should see the following screen.
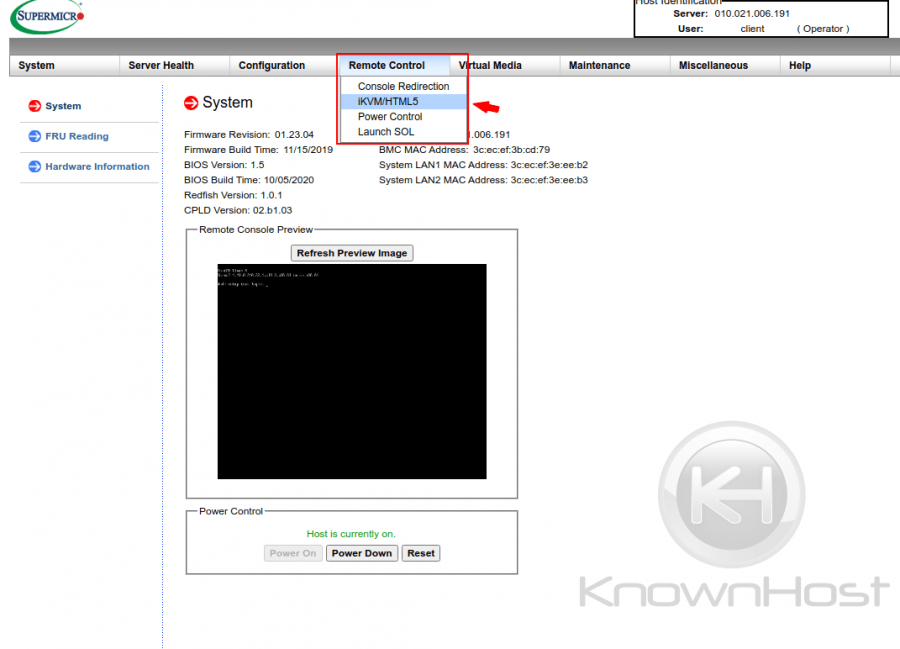
Some IPMI Interfaces may display this as “Remote Control -> Remote Console” — it is the same to get to the HTML 5 console.
Within this screen you’ll want to click “Remote Control” which will drop down and show you the “iKVM/HTML5” link which you will then click to get to the console.
You’ll be brought to a page that says “This page can be used to access a server remotely using iKVM with HTML5.”
Click the “iKVM/HTML5” button and you’ll get a new pop up window with your console access.
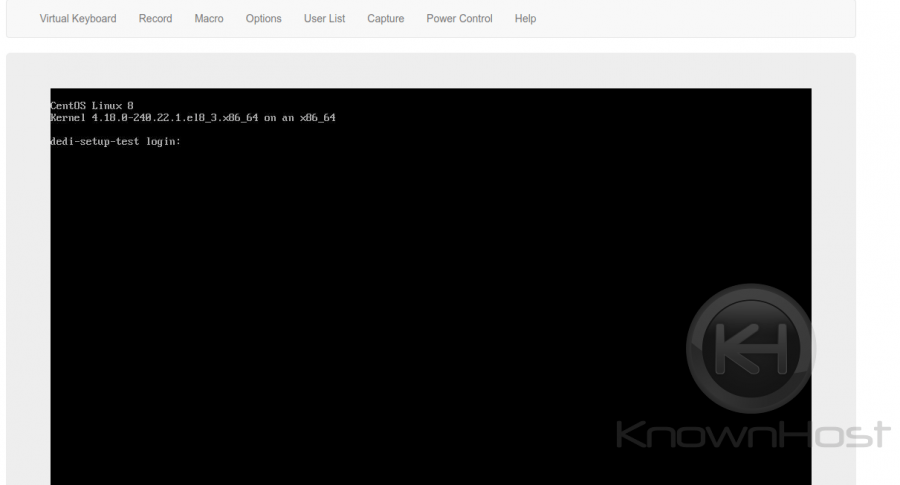
That’s it, you’re now able to login to your server via your root password and manage your server as necessary.
Accessing KVM Java Applet
If you’ve purchased one of the older budget dedicated servers then chances are likely that the HTML5 KVM applet won’t be available to you. This means that you’ll have to utilize the KVM Java Applet.
This section assumes you’ve noted above and already logged in and managing your dedicated server through the Dedi. Server Management Panel.
You’ll want to click “Launch KVM” – when clicked, it’ll ask you to add your IP to the ACL (you’ll want to click Add ACL)
This will download a file labeled viewer.jnlp.
When you launch this file it’ll execute via your whatever java program you have installed for KVM viewing (such as IcedTea)
But the applet isn’t working?
Due to browser security issues as of recent years with Java – there’s the likelihood you may not be able to get the KVM Java Applet to work.
Don’t fret! There are ways around this.
In such cases, we recommend checking into the IPMIView application.
1. Login to https://my.knownhost.com, navigate to the downloads section and download the appropriate labeled IPMI tool for your OS.
2. If you’re using Windows, run the exe file and install the application. For Linux, extract the archive’s contents into a directory.
3. Edit the following file depending on your OS:
Windows: Program Files/SUPERMICRO/IPMIView/jre/conf/security/java.security
Linux (In the directory you extracted the archive): jre/conf/security/java.security
jdk.certpath.disabledAlgorithms=
jdk.jar.disabledAlgorithms=

jdk.tls.disabledAlgorithms=
Note: The blank after each “=” is intentional.
There may be one or more matching line for these items, one or more being a comment/instructions (usually starting with #) and the other being the actual configuration line. Be sure you modify the configuration line.
Its important to note that this is only changing the settings for IPMIView, nothing else on your workstation. These modifications allow IPMIView to be backwards compatible with the older Budget Servers
4. After clicking the “Open SuperMicro IPMI Web Control Panel”, copy and paste the IP that appears in the new tab/window that opens and use it when creating a new connection in IPMIView. Use the Client Username and Password shown in the Dedicated Control Panel to connect and then select KVM Console.
We hope that this article has helped you access your server’s KVM/IPMI.