How to: Logging into My KnownHost?
KnownHost has two different portals to manage customer’s billing-related and support-related queries efficiently. The first is Billing Portal for all your billing-related tasks with the purchased services, and the second is the Supportal Portal, through which you can connect with our team for sales and support-related stuff.
Logging into Billing (my.knownhost.com)
Billing Portal is the default portal on which you get registered while placing an order with email address and the password. The same registered emaila ddress and the password you need to use while logging into the Billing Portal.
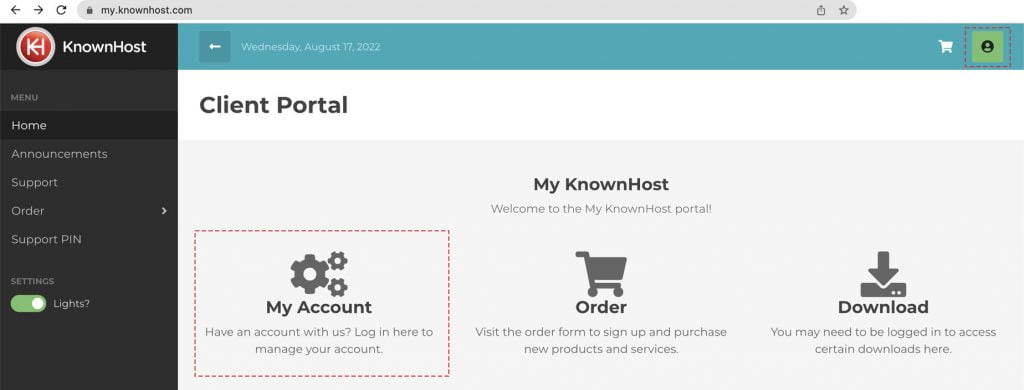
1. First navigate to KnownHost client portal. Then, click on My Account or click on User icon situated at top-right corner.

2. Enter the Registered Email Address & Password.
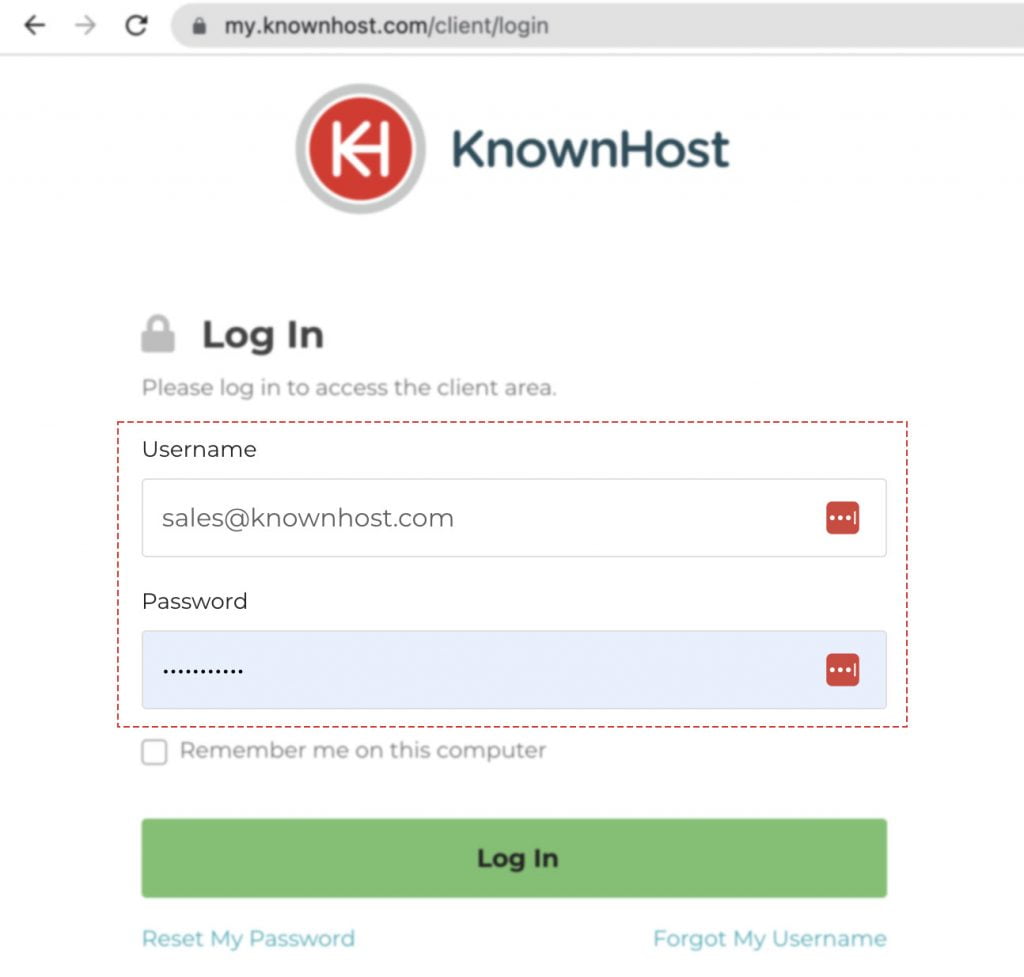
3. Click on Log in.

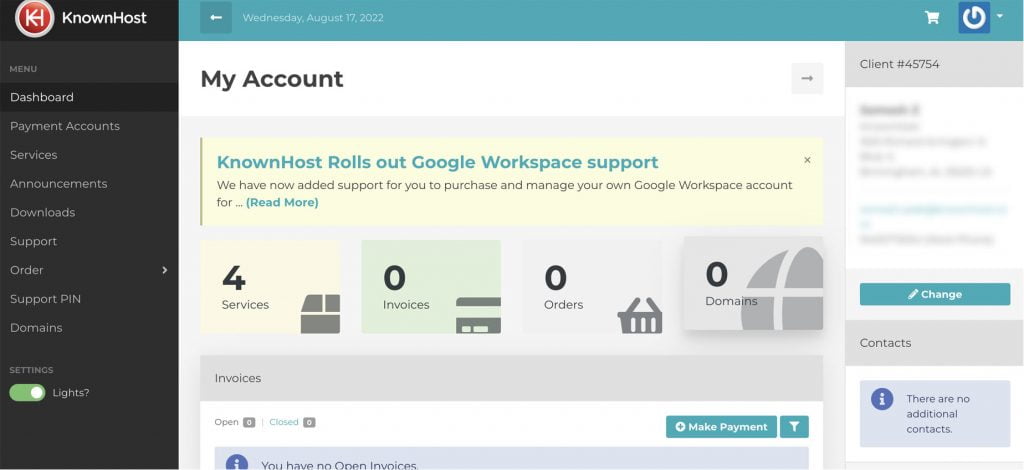
4. Congratulations! You have successfully logged into KnownHost Billing Portal.

Logging into Support (support.knownhost.com)
1. Login to Billing Portal, click on Support. However, you will not be automatically logged into the Support Portal by clicking on this link. You will still need to enter the login information for the account for the Support Portal. This might have a separate username from the one used to log into the Billing Portal. You can also access the support portal through: support.knownhost.com URL..

2. If you do not first log in, you will only have access to create tickets with the Sales Department. If after clicking the “Submit a ticket” button, the page looks like this, you have not yet logged in and still need to do so.

3. Enter the email address and desired password in the Login Box → Click on Login. If you haven’t yet login into the Support Portal before, the system will print “Your email address hasn’t been verified or requires re-verification. A verification email has been sent to you with a confirmation link.“, check your email address inbox and complete the email address verification by clicking on the verification link.


4. After successful verification. Re-enter the registered email address and the password → Click on Login.

5. Navigate to submit ticket portal, select the required department and you can get in touch with our Support, Billing, and Sales team. Congratulations! You have successfully registered on the Support Portal.

Submitting The Ticket
1. Visit our support portal/. Enter registered email address and password of Support Portal.

2. Click on Submit a Ticket or navigate to support.knownhost.com/Tickets/Submit.

3. Select the department Support, Sales, and Billing per the query. Mostly, customers get in touch with us for technical assistance through tickets. So, for this example, we will select Support and click on Next.

4. Here, you need to select the appropriate options and fill up the asked details,
Priority: Normal, High, Critical.
Note that “Critical” is intended for if the server itself or the major daemons are down (eg, apache, mysql, exim, etc). If a Critical ticket is opened for a non-Critical issue, we would still be required first to check for Critical issues, then if none are found, to adjust the ticket Priority accordingly. For this reason, choosing “Critical” when neither the server itself nor the major daemons are down would result in slower resolution of the actual issue, not faster.
Account Information: If you are having a VPS or a Dedicated Server (Managed/Un-managed) service with us then do provide us the correct server details (IP/Domain, SSH Port, Password).
- If the password you enter is incorrect, we ask as you for the correct password. If you are not sure, we can reset it for you upon request, but it will save both our time and yours if you can enter the correct password here.
- In particular, check that your browser’s autofill feature is not adding incorrect information here.
- The default ssh port for our servers (2200) should already be filled in. If your server uses a different port for ssh, please enter your server’s ssh port in the “SSH Port” text box.

5. This is the most crucial part. Enter the short subject line describing the exact issue/query/problem. Furthermore, in the Description box, provide detailed information about the issue/query/problem. If you can provide us with steps to replicate the issue, that will help us to resolve the known problems quickly.
If you want to attach some files, you can do with Attach File Option. Add a separate email to receive ticket updates that you can mention in the CC.

6. Finally, click on Submit.

7. Now, you should get the confirmation of the ticket on the browser as well as on your registered email address.

8. Every time our agent updates their response on the ticket, the same copy will be shared with you on the registered email address as well as you can view/manage the ticket from the Support Portal → My Ticket section. If the ticket was opened with the Support Department, you should hear back within a few minutes. You can check the department-wise availability of the staff below,
- Support Department: 24x7x365
- Sales & Billing Department: Monday to Friday – 7:00 AM – 7:00 PM CST

Conclusion
This article is meant to be for all the new customers of Known Host. If you are ever stuck somewhere, we are here to help you! We have covered a step-by-step guide on logging into Billing Portal, registering yourself on Support Portal and the ticking submitting procedure.
KnownHost offers 365 days a year, 24 hours a day, all 7 days of the week best in class technical support. A dedicated team ready to help you with requests should you need our assistance. You’re not using KnownHost for the best webhosting experience? Well, why not? Check with our Sales team to see what can KnownHost do for you in improving your webhosting experience.