Detecting and Cleaning EITest Infections Following Spamhaus and CBL Blacklisting
EITest Infections and Blacklists
EITest is older malware dating back to at least 2011 that uses compromised websites to accomplish several different nefarious tasks, such as directing users to Exploit Kits landing pages which are responsible for distributing various types of malware. One of the latest was the payload being downloaded to victim’s computers to generate fraudulent traffic. This was disguised as a popup to notify the user of a ‘problem’ stating that the user was missing the “Hoefler text” font, which was accompanied by the proposed solution to download the font via the “Chrome_Font.exe” file. The user would remain uninfected until they executed the downloaded file, which would then begin generating malicious traffic via background browsing on the victim’s computer. EITest Nabbing Chrome Users with a “Chrome Font” Social Engineering Scheme
Many infections of Eitest were the result of WordPress exploitation via the MailPoet plugin vulnerability in 2014. Let me stress that WordPress is no less secure than other CMSs on average, it is just the most popular choice by far and thus an ideal target for generating malicious traffic. Nonetheless, this malware was also seen with other CMSs, but the proportion of affected WordPress sites outnumbers those of other CMSs primarily because the number of WordPress sites overall outnumbers that of other CMSs.
You have probably found this article because your server’s IP is blacklisted via Spamhaus, which then states that the blacklisting is due to being listed on the CBL due to an EITest infection.
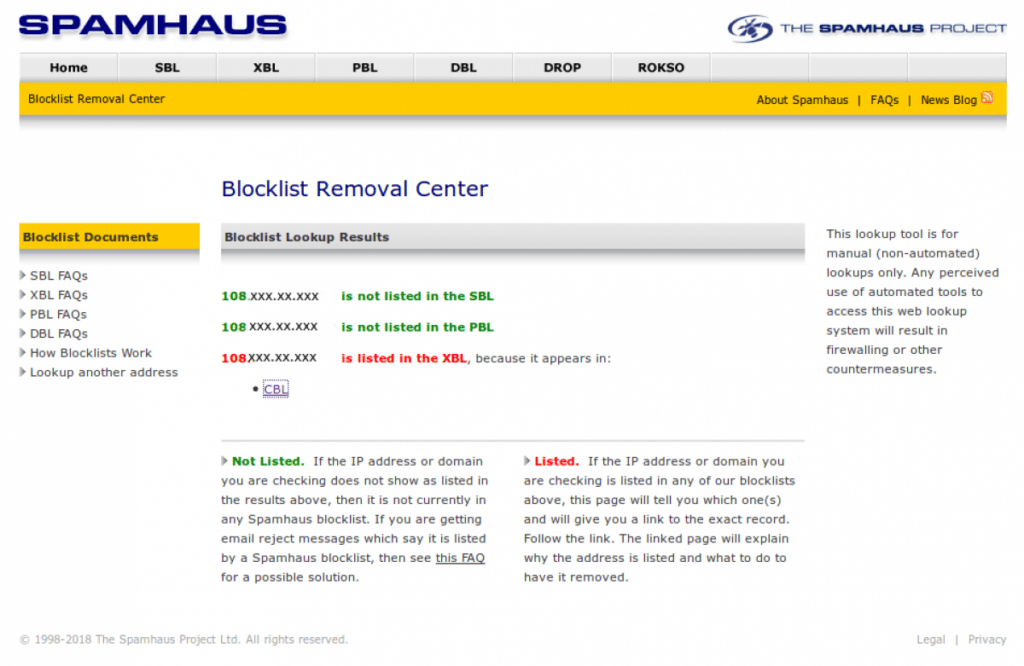
If you were to visit Spamhaus, the URL and results would be as follows (where 108.xxx.xx.xxx) represents the mail server IP):
Spamhaus Blocklist Removal Center
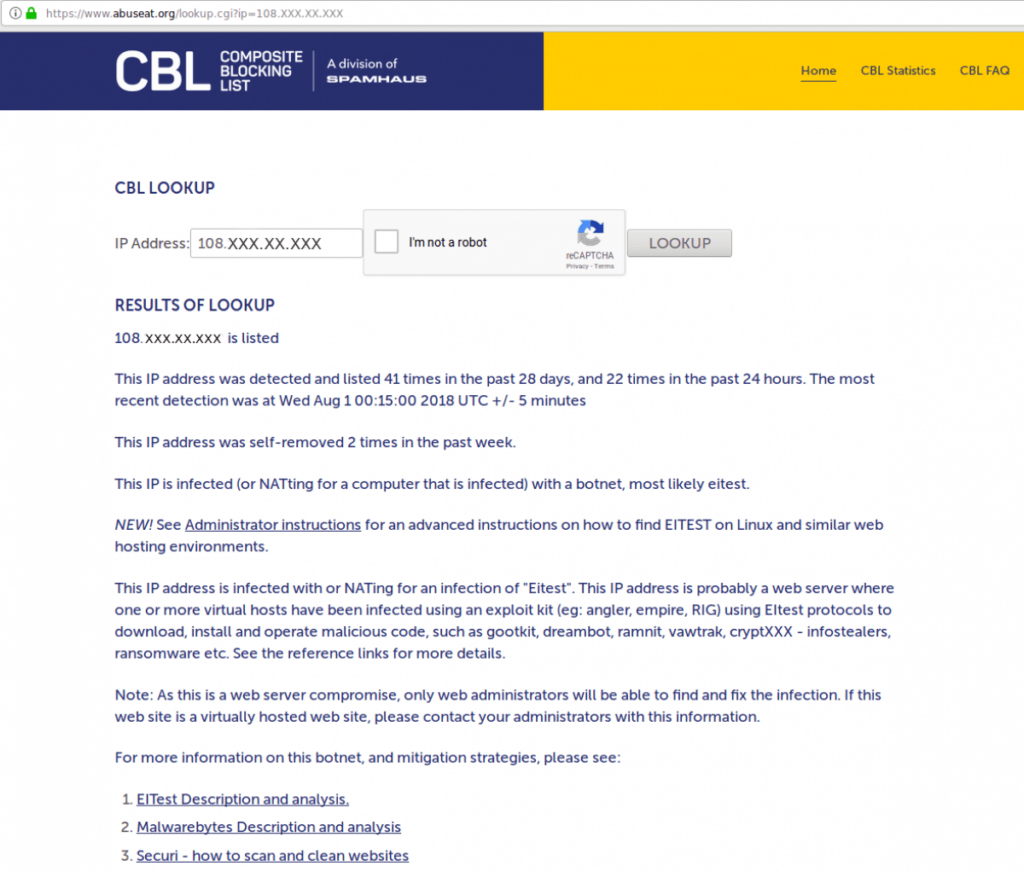
Once you click on the CBL link above, you are taken to a page similar to this:
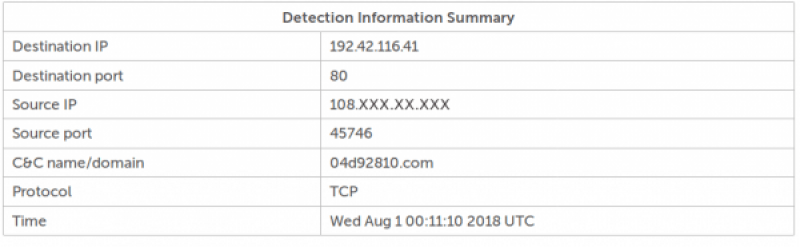
Scrolling down the page will then reveal details about the detection like so:
The CBL is quite trusting as it will allow you to self-remove your IP from the blacklist, however, if you do so without actually cleaning the EITest infection, it will detect this continuing EITest activity and stop allowing you to self-remove your IP. The CBL page will state something along the lines of the following:
Self Removal:
Normally, you can remove the CBL listing yourself. If no removal link is given below, follow the instructions, and come back and do the lookup again, and the removal link will appear.
Too many relistings in the past 24 hours (22), we recommend you read and implement our suggestions, and try again in a day or so.
That particular server had been re-listed 23 times in a single day. Obviously, EITest infections is a very active malware and monitoring the network activity to find what account is responsible shouldn’t take too long to yield results. It is certainly nothing that should be taken lightly. Allowing it to persist indicates that vulnerabilities exist in your site(s) that could all sensitive data such as your customer’s data to be stolen and/or cause damage to your server’s, site’s or business’s reputation. Thus, it is imperative to actually clean the infection from your account(s) and then properly secure your account(s) to prevent further malware infections, even if Eitest has been completely sinkholed.
EITest itself isn’t the major concern since it has been rendered essentially harmless due to the infection sinkhole operation by Proofpoint, abuse.ch, BrilliantIT, and Twitter user @Secu0133. on March 15, 2018. Though the blacklisting is a bit frustrating since it affects mail deliverability, the real concern is the vulnerabilities and possible backdoors that exist on those compromised sites and the potential adverse effects on those that visit the site.
How To Find the Infection
The information provided via the CBL can be quite daunting, confusing, and overly technical for many site owners. Many don’t know how to monitor their traffic to determine the infected user, and may have many sites on their reseller servers which complicates pinpointing the infection.
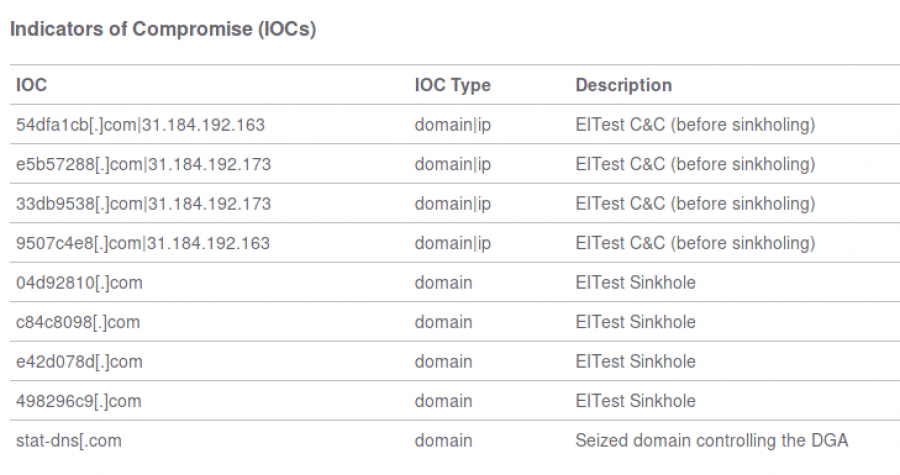
Proofpoint has provided the following list of C&C domains and the Sinkhole IP to monitor for.
When digging one of the domain listed for its A record, you can see that the A record returned is a sinkholed IP belonging to abuse.ch:

Abuse.ch has provided the shtracer.pl script to monitor network traffic to help in identifying where the infection is, and then LASKOWSKI-TECH went even further to expand on this method for other operating systems and to include custom yara signatures. FINDING BOTNETS ON SERVERS – INTRODUCING “SHTRACER”
Here at KnownHost, we decided to combine parts 1 and 2 into one script and modify it so that it is cPanel server specific, so that finding and eliminating this infection can be as easy as possible for our customers.
The purpose of this script is to help detect Eitest infections on cPanel servers and locate the malicious files. It does the following:
- Uses netstat to monitor the network for connections to the sinkhole IP. If your cPanel server’s IP is blacklisted via CBL, it will ask you for the sinkhole IP. It will use the known sinkhole IP as the default if you simply press Enter when asked. This was done to allow the script to remain effective in case the sinkhole IP is changed in the future.
- If and when a connection to the sinkhole IP is detected, it will then log the output of lsof -p PID to /root/support/detect-eitest/eitest-files-$PID.log and the output of netstat for that connection to /root/support/detect-eitest/eitest-connection-log.txt. It gets the infected user’s username from this detection.
- It then asks if you want to run Clamscan on the infected account. If so, it checks to see if cPanel’s Clamscan RPMs are installed and installs them if not.
- It will git clone the custom Yara rules used for Eitest infections PHP malware.
- It will then initiate a Clamscan instance for the infected user using these rules.
- It kills the screen session running the monitoring script.
- It outputs the results of the Clamscan here: /root/support/detect-eitest/scanresults.txt
You can download the script by simply clicking the file link below. As always, it is recommended to review any scripts you download off of the internet before you run them.
#!/usr/bin/env bash

# Eitest Script for cPanel Servers

#Get Sinkhole IP

echo Enter Destination IP from the Detection Information Summary CBL report or press enter if the Destination IP is 192.42.116.41
read input

mkdir -p /root/support/detect-eitest && cd $_
script=eitest-monitor.sh
(
cat <<'EITESTSCRIPT'
#!/usr/bin/env bash
sinkhole=${input:-"192.42.116.41"}
while true; do
 connect=$(netstat -tpn | grep $sinkhole);
 if [[ $connect ]]; then
 PID=$(echo $connect | awk '{print$7}' | cut -d '/' -f1);
 (lsof -p $PID > eitest-files-$PID.log &)
 echo $connect >> eitest-connection-log.txt;
 fi
sleep 0.01
done
EITESTSCRIPT
) > $script


# Start Process Detection Script

chmod 755 eitest-monitor.sh
screen -S eitest-monitor -dm bash -c './eitest-monitor.sh'


# Wait Until a Eitest Connection is Logged to Get the Infected User

echo
echo
echo Monitoring the Network for Eitest Activity Now ... ... ... ... ...
echo ... ... ... ... ... ... ... ... ... ... ... ... ... ... ... ... ...
until  [ -e eitest-connection-log.txt ]; do
 sleep 60
done


sleep 15
RED='\033[0;31m'
NC='\033[0m' # No Color
file=$(ls -lah | grep eitest-files-[0-9] | tail -1 | awk {'print $9'})
user=$(tail -1 $file | awk {'print $3'})
echo
echo -e "${RED}Eitest Connection Detected for user ${user}! Initiating Clamscan using Yara Signatures on Account...${NC}"
echo

echo "Do you want to initiate a Clamscan on this account now? [Y/N] This will install clamscan and the necessary custom yara rules if not installed already."
read input
if [ $input == "y" ] || [ $input == "Y" ]; then
 echo Proceeding...
else
 echo Terminating Script now...
 screen=$(screen -ls | grep eitest-monitor | awk {'print $1'})
 screen -X -S $screen quit
 exit
fi

#Check for Clamscan and Install if Necessary

if [ -f /usr/local/cpanel/3rdparty/bin/clamscan ]; then
 echo Clamscan is installed. Proceeding.
 echo
else
 echo Installing Clamscan...
 echo
 /scripts/update_local_rpm_versions --edit target_settings.clamav installed
 /scripts/check_cpanel_rpms --fix --targets=clamav
fi

echo Git the Eitest Yara Signatures for Clamscan...
echo

if [ -f /root/support/detect-eitest/lw-yara/lw.hdb ]; then
 echo Custom Yara Rules are installed. Proceeding.
 echo
else
 echo Installing Custom Yara Rules...
 echo
 git clone https://github.com/Hestat/lw-yara.git
fi

# Start Clamscan With Eitest Yara Rules for the User

/usr/local/cpanel/3rdparty/bin/clamscan -ir -l scanresults.txt -d lw-yara/lw-rules_index.yar -d lw-yara/lw.hdb /home/$user

#Kill Screen

screen=$(screen -ls | grep eitest-monitor | awk {'print $1'})
screen -X -S $screen quit

#Print Results

wd=$(pwd)
echo Scan Complete! Results: $wd/scanresults.txt
To use this script, download and then do the following:
sh eitest.shOr:
chmod +x eitest.sh
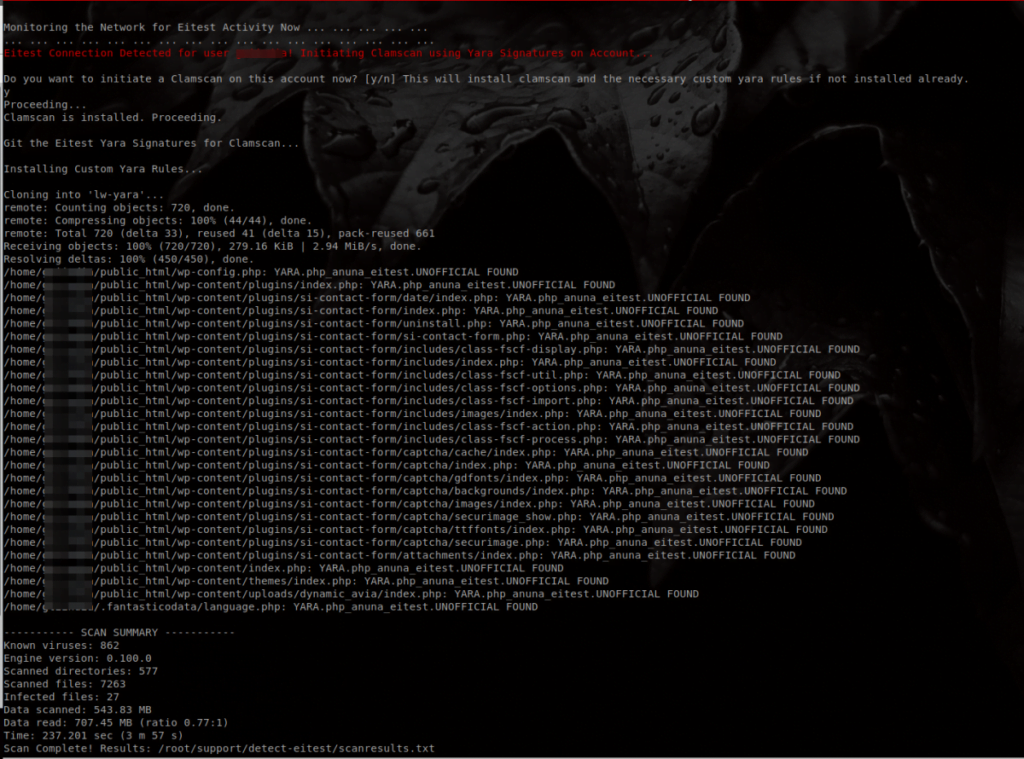
./eitest.shAnd then follow the prompts. The following shows output from running this script on an infected server.
This script was adapted to automate this process for cPanel servers and much attribution must be given to Mark David Scott Cunningham, Abuse.ch, LASKOWSKI-TECH, Twitter users @kafeine, @Secu0133, and those others listed in this article for their hard work to protect the internet and combat this malware. Much of the monitoring portion of the script above was adapted from the script eitest-connection-watch.sh written by Mr. Cunningham.
Removing the EITest Infections
Due to the highly customizable nature of websites, KnownHost is unable to provide a single solution for cleaning an infected site. We can, however, provide some direction. Once you have run the script and it has identified the infected user, you can then use the Clamscan results from the script’s output to help you and your developer get started with removing the malicious code. It isn’t enough to remove the malicious code alone. You must also secure the vulnerabilities in the site that allowed the initial compromise. You may choose to restore from a backup prior to any compromise if you have one older than the date that the compromise first occurred. Even if you choose to go this route, you must still make sure to secure the site. As with any compromise, you will want to check the databases to make sure that no extra users with administrator privileges had been added. WPScan is an excellent tool for discovering vulnerabilities in a site’s code, plugins, or themes if you are using WordPress. Similar tools exist online for other CMSs. EITest infections have been around long enough! Let’s end it once and for all!
Remember: that KnownHost is here to help! If you would like for us to run the script for you since it requires SSH root access, then please open a support ticket. We can also run WPScan for your domain as well. Once you have cleared the malware infection, we would be glad to run the script for you again or to help with submitting a delisting request if necessary.