Email Best Practices: Mail Server Configuration
Email Best Practices 101:
- Email Best Practices: Avoiding the Spam Box and Blacklists
- Email Best Practices: Mail Server Configuration
- Email Best Practices: Email Design and Feedback Loops
This section of the guide will help detail and explain the methods for how to set up proper mail server configuration.
Configuring your mail server is an involved process, however, KnownHost is here to help. cPanel makes it easy to create email accounts for your domain, but it is your responsibility to ensure that they are configured properly. cPanel is a smart software, and you can create the cPanel account from the beginning with SPF and DKIM, but not with DMARC, nor checks to ensure your FQDN resolves to the IP that should be set as the PTR, etc. There is much more to it, so let’s clarify this further.
Configuring DNS –Mail server configuration
There are certain DNS records that you should configure immediately if you want to use your domain for mail. Many of these records can be created as soon as you create the cPanel account for your domain. Let’s discuss each and why each record type is important.
MX
You need to configure a MX record if you want to receive emails. You will want to also configure ‘abuse’ and ‘webmaster’ email accounts for your domains so that you may receive complaints about your emailing practices and then rectify them in order to protect your sending reputation. This record is configured by default when you add a domain via WHM/CPanel. You can check that your domain has a MX record using the following command:
dig mx +short domain.tldBe sure to replace ‘domain.tld’ with your actual domain. If you have no output, then you have no MX record. If you have output, then the output is your current MX record for that domain (provided you’ve not made any DNS changes in the past 2 days as DNS changes can require up to 2 days to process).
DKIM
Email spoofing is the creation of email messages with a forged sender address, a technique that is popular among spammers to make the email appear to have a different origin server/domain. To combat spoofing, certain email authentication methods were developed. One of which is DomainKeys Identified Mail. The domain that sends the email will have a digital signature added to the headers of an email. This signature can be validated against a public cryptographic key published in the domain’s DNS records. The public key is published in a DNS TXT record, and the private key is made available to the DKIM-enabled outbound email server. So, the domain’s public TXT record contains the DKIM key that can be used by the recipient to decrypt the signature contained in an email’s headers and thus verify that the email actually originated from that domain unaltered.
The existence of a DKIM record can be confirmed by checking the TXT record of the selector subdomain:
dig TXT +short selector.domain.tldOn cPanel servers, the default selector is ‘default._domainkey’, so the query would be as follows:
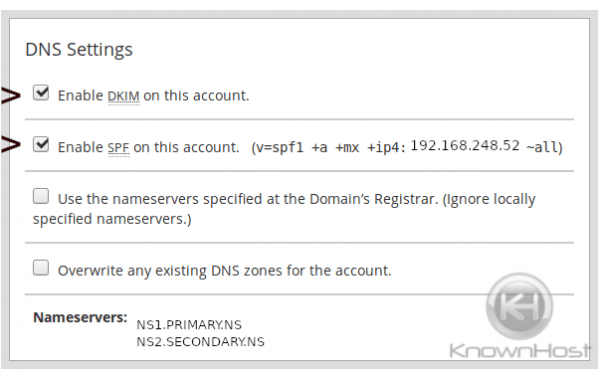
dig TXT +short default._domainkey.domain.tldIf you are using a cPanel server, make sure that the option to automatically generate a DKIM record for the domain is checked when you create a new cPanel account via WHM ⇒ Home »Account Functions »Create a New Account.
An example TXT record is shown below:

SPF
The purpose of a SFP record is help combat/prevent email spoofing. This occurs when someone from one location tries to envelop a spam message from someone else at another location. If they send a lot of spam, it could cause the innocent party’s IP to become blacklisted instead of the actual spammer’s IP. To fight this type of abuse, SPF records were developed. These tell mail servers from what IPs they can expect legitimate mail to come from for that particular domain, and if the mail comes from elsewhere, to delay or reject it.
To check for the existence of a SPF record, you need to query the TXT record of the domain:
dig TXT +short domain.tldYou should see output like in the following screenshot, which states that any IP that the A or MX record resolves to plus any IP followed by the ip4 identifier are allowed to send mail for the domain queried:

You can publish a SPF record with either a soft-fail (denoted by the tilde symbol ~) or hard-fail (denoted by the minus symbol -). This instructs the receiving mail server whether you want messages that fail SPF checks to be tagged but delivered, or outright rejected. It is recommended to test first with a soft-fail record because though SPF is highly recommend and even required by some major mail service providers, it can result in some legitimate mail failure. For example, email forwarding issues may occur due to SPF checks or failures with domains that have been configured to send from an IP other than the main outgoing Exim IP but haven’t had the corresponding IP updated in the SPF record. Thus, cPanel servers will by default configure SPF with the softfail SPF record.
PTR
Your mail server IP absolutely must have a PTR record if you will be sending mail, otherwise your emails will likely be rejected. KnownHost sets a PTR record for your primary IP to use your hostname. If you decide to change your hostname, please notify KnownHost immediately so that we may make the appropriate changes on our end. Note that your hostname must also resolve back to the same IP that is using the hostname for its PTR record. If this is not the case, then PTR validation checks may fail. KnownHost does this automatically for the hostname and primary IP as the hostname should resolve to the primary IP and the primary IP will be used by default for sending all mail.
If you decide to send mail from dedicated IPs, you must have your host configure PTR records for each of those dedicated IPs as well. Any IP that you decide to use for sending mail must have a valid PTR record, and must resolve to the same IP that uses the hostname as the PTR record for that IP.
You can check for PTR records using the following command where XXX.XX.XX.XXX is the IP that you will query:
host XXX.XX.XX.XXXIf a PTR record is set, you will see it in the results. If no PTR record is set, then you won’t see any results from the previous command. If you do have a PTR set, you should take the hostname that is set as the PTR and make sure that it resolves to the same IP that it is being used as a PTR record for using the following command:
dig a +short hostnameFor example, in the following, we have the IP “162.XXX.XX.XXX”. We check the PTR record for this IP, which returns “reversedns.hostname.tld.”.

We then query the A record of “reversedns.hostname.tld.” to ensure it resolves back to the exact same IP “162.XXX.XX.XXX” that uses it for its PTR record:

As long as these two records match one another, then the PTR is set correctly for that IP.
DMARC
Domain-based Message Authentication, Reporting and Conformance (DMARC) allows a mail server administrator to publish a policy via DNS TXT resource records that specifies what email authentication techniques should be expected from the domain and how the recipient mail server should handle emails that fail SPF, DKIM, or both, and do not align. DMARC also enables reporting via aggregate reports (statistical data) and forensic reports (includes the message at fault). To pass DMARC, a message must pass SPF authentication and SPF alignment and/or DKIM authentication and DKIM alignment.
Wait, what is alignment?
DMARC is primarily for verifying that the address in the ‘From’ header is the actual sender of the message, but DKIM and SPF do not require the From header and the user identity for either DKIM or SPF to match. Alignment means that these domains should match and is the reason why both DKIM and SPF may both pass but an email still fail DMARC.
For DKIM, alignment means that the domain used to create the signature (the d= parameter), should match the ‘From’ header .
For SPF, this is the domain in the MAIL FROM portion of SMTP or the EHLO/HELO domain, or both. Most of the time the ‘Return-Path’ header is used for this.
In summary, DMARC attempts to tie the results of SPF and DKIM to the content of email: specifically to domain found in the From:header of an email. Identifier Alignment is how existing email authentication technologies are made relevant to the content of an email. Getting identifiers to align ends up being a large part of the work of deploying DMARC.
Google recommends the use of DMARC for bulk email senders.
The Sending IP
Ideally, you would want to keep each domain that sends a lot of mail on its own dedicated IP and then have it also send mail from that IP, however, the quantitative constraints on IPv4 address availability can limit this as an option for many. If you do host bulk senders on the same server, then it would be best to limit them to sending on their own IP if at all possible. If you are sending in bulk, it would make sense to further separate the email streams by IP based on whether the emails are transactional or promotional since promotional will likely have a lower reputation by default.
You will also want to ensure that you keep this IP the same over time. Changing the IP frequently will only damage deliverability because you will then need to start fresh each time building the new IP’s reputation. Keeping the IP consistent along with good email practices are key to reaching your audience’s inbox.
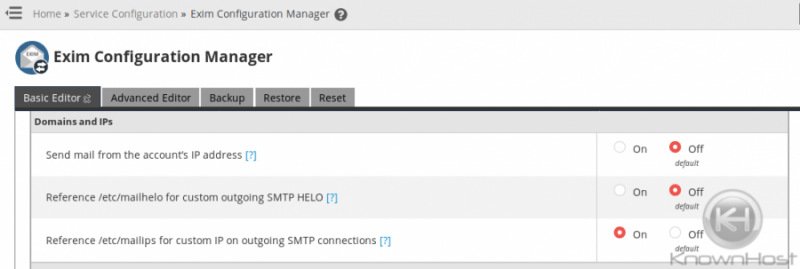
There are 2 ways you can reconfigure what IP your server sends mail as aside from the default, which is to send via the primary IP. If the domains that you want to have sending email from their own IP are using a dedicated IP, you can simply select the option to Send mail from account’s dedicated IP address in WHM’s Exim Configuration Manager interface ( Home » Service Configuration » Exim Configuration Manager ). Make sure that all IPs used have the PTR record configured before you enable this option!
All options for both methods discussed here are located under the Basic Editor‘s “Domains and IPs” section of the Exim Configuration Manager as seen below:
The next method involves editing configuration files directly via SSH. Changing the outgoing mail IP manually by editing the /etc/mailips and the HELO by editing the /etc/mailhelo files on a cPanel box must be done as the root user via the command line. This method gives you the most freedom to customize your configuration. Let’s say that your server has 2 IPs:
- 111.222.333.444
- 555.666.777.888
And it has 10 domains. You want half of your domains on one IP and the other half on the other IP. You will first make sure that these IPs have appropriate rDNS configured, and then you will proceed to edit the /etc/mailips file like so:
  domain1.com: 111.222.333.444
  domain2.com: 111.222.333.444
  domain3.com: 555.666.777.888
  domain4.com: 555.666.777.888
  *: 111.222.333.444
You will properly configure the /etc/mailhelo file, too:
  domain1.com: domain1.com
  domain2.com: domain2.com
  domain3.com: domain3.com
  *: hostname.domain1.com
The last step is to enable the necessary options in the Exim Configuration Manager to tell it that you want to use these settings. In the Basic Editor section of WHM’s Exim Configuration Manager interface (Home » Service Configuration » Exim Configuration Manager), you will enable the following options and save:
- Reference /etc/mailhelo for outgoing SMTP HELO
- Reference /etc/mailips for outgoing SMTP connections
A /etc/mail_reversedns file exists as well, but KnownHost will set the rDNS for you on our end. Just let us know how you want it set and we’ll be glad to help.
Server Alerts
Always make sure to promptly address and server alerts that are sent. There are several reasons for this.
You will want to address server alerts that are sent when those alerts are sent from the firewall alerting you to suspicious activity, spam scripts, relay events, etc on your server. These will be sent via the firewall and these are extremely important to address as quickly as possible. Knowingly ignoring malware or spam running on the server could result in an Abuse ticket with your host, could result in further compromise to other accounts, or could lead to complete server compromise. It is imperative that these issues be investigated and corrected immediately to maintain a secure hosting environment, client trust, and prevent blacklisting if spam/malware exists on the server. The firewall will alert you to its presence before a blacklist will, so definitely take heed when LFD alerts are received. If you are unsure how to proceed when you receive a LFD alert, please send the alert to your host’s support team.
I know that our team at KnownHost would love to help you resolve the issue before it causes you bigger problems.
Other notifications that may be sent from the server should be addressed as soon as possible, but are not nearly as urgent as those sent by the firewall. These would include update available/completed notifications, backups failure notifications, etc. You will still want to address these, though, because these are sent via user@hostname.tld and are often sent repeatedly with the same subject line. If the issue is ignored and these emails persist, they can begin to look like spam to a remote receiving mail server. It is important to mark these as important emails and not spam so that the remote mail server you are using doesn’t begin to classify your server’s emails as spam.
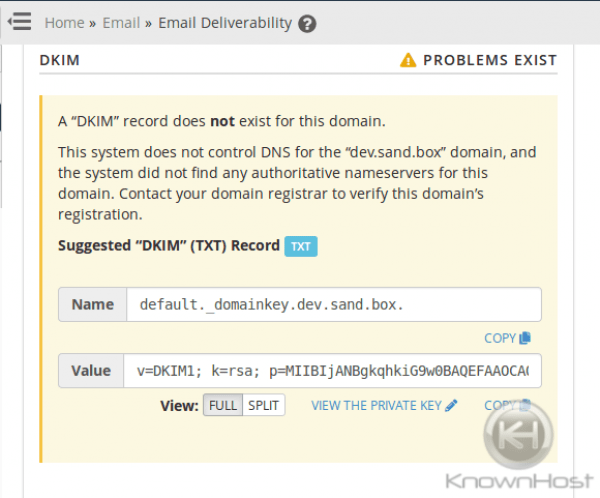
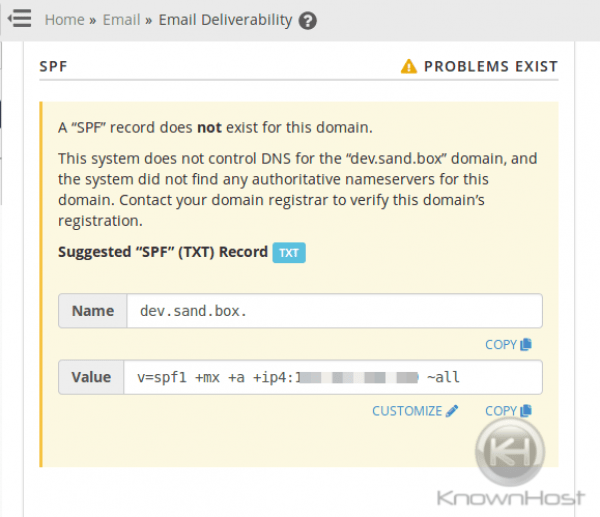
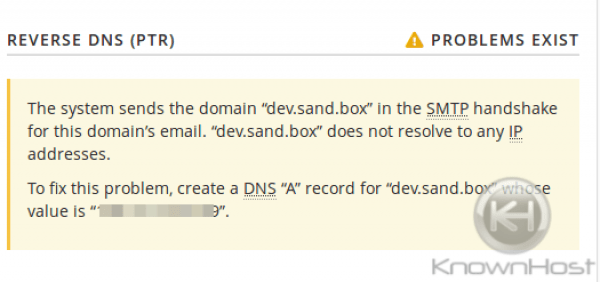
Also, make sure to add SPF and DKIM, for the server’s hostname. Be sure that the PTR exists as well (KnownHost will set this up by default using the hostname as the PTR for the primary IP). This will help tremendously with those ‘root@hostname.tld’ emails that are sent from the server to any remote mail server. This can be done via WHM »Email »Email Deliverability for cPanel v78 and up.
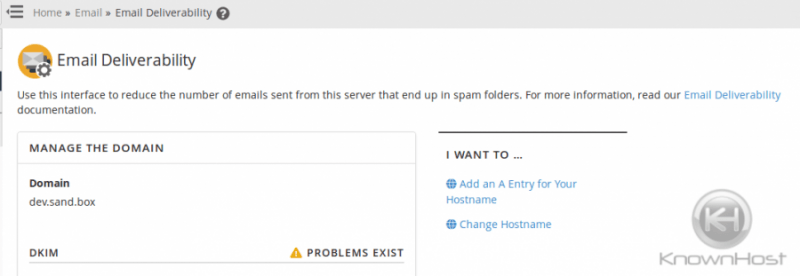
With this interface you can generate/check a DKIM record for hostname:
As well as an SPF for the hostname:
And add/check for a valid PTR:
Forwarding Email –Mail server configuration
Forwarding email in itself if normally not a bad practice, however, it is when you receive spam to the forwarder that then forwards the spam emails to a remote mail server. What makes this a problem is that the receiving mail server sees this spam email as having originated from your mail server, and not as mail that was forwarded! For this reason, KnownHost explicitly urges users not to forward mail to remote mail servers (for example, from your KnownHhost server to your Gmail account).
Many times, users forward mail because they want to check their email from one single account. This can be accomplished without forwarding email to a remote mail server if your remote mail server offers a mail fetcher feature like Gmail does.
If you feel that you absolutely must forward email to a remote mail server, you will want to do so on a very limited basis and make sure that some options are enabled in the Exim configuration of your server.
First, make absolutely sure that SpamAssassin in enabled for the user that will be forwarding mail. Next, you will locate the following in WHM:
Home >> Service Configuration >> Exim Configuration ManagerOnce located, you will enable one of the following settings to scan all forwarded mail:
- Do not forward to external recipients if it matches the Apache SpamAssassin™ internal spam_score setting.
- Do not forward mail to external recipients based on the defined Apache SpamAssassin score.

Do note that these two options only apply to forwarded mail. There is yet another unsupported workaround if you wanted to scan all outgoing mail. This option isn’t supported by cPanel at this time, though.
Another issue with mail forwarding is the possibility of erroneous SPF failures due to the fact that the intermediate forwarding server is not included in the SPF record but the recipient server sees these messages as coming from the forwarding server. The SPF if set will likely only specify the true source server and not the forwarding server, thus potentially causing SPF failures. To circumvent these SPF failures for forwarded emails, make sure that the following is enabled in your Exim configuration on your cPanel server via WHM » Home » Service Configuration » Exim Configuration Manager under the “Mail” tab:
Enable Sender Rewriting Scheme (SRS) Support
This option rewrites sender addresses so that the email appears to come from the forwarding mail server. This allows forwarded email to pass an SPF check on the receiving server.

This setting defaults to Off, so you may need to enable this option upon configuring email forwarders if your forwarded mail shows SPF failures. .
You should also consider preventing incoming spam as an effective measure at limiting the amount of spam you forward. Thus, you may consider enabling some protections that cPanel offers. There are an abundance to consider:
- Apache SpamAssassin
- Spam Filters
- Box Trapper
- RBLs and other customizations
- Spam Filters
- Custom Exim System Filters
- Mail Limiting Features
Consolidating Accounts for Convenience
If you have several accounts that you’d like to check often and are trying to use email forwarders to forward all emails to a single account, you can avoid the trouble with email forwarders altogether. If you have an existing Gmail account, you can check your self-hosted accounts from within Google using Gmail’s Mail Fetcher feature. Gmail’s Mail Fetcher feature provides you with the option to import your old domain emails into your Gmail account and then continue to bring in new emails (the “Get all messages” option). If you were hoping to consolidate multiple accounts into one location, this is an ideal solution. In the long run, it may save you substantial disk space and inodes as well since you won’t be storing multiple copies of a single email across several accounts.
Mailing Lists
When compiling Mailing Lists, always make sure to only add users to the list that actually want to receive your mail. Adding users that don’t want to receive your mail and will mark your emails as spam will likely cause your email reputation to plummet and cause your legitimate subscribers’ email filters to filter your email as spam. This accomplishes the exact opposite of what was intended. Less rather than more are receiving your mail.
Make sure that you do not ever purchase mailing lists from a 3rd party. Many of these contain very old, inactive email addresses. Some of these email addresses have been taken for use by major providers as spam traps. Thus, by purchasing a mailing list, you may inadvertently get your mail server blacklisted faster than ever.
The best way to build a good mail server reputation and to build trust with your clients is by honestly building a legitimate mailing list.
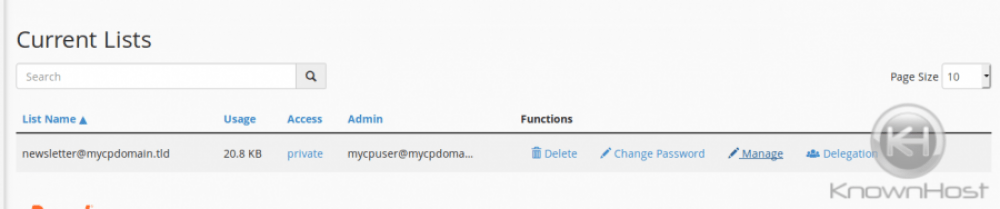
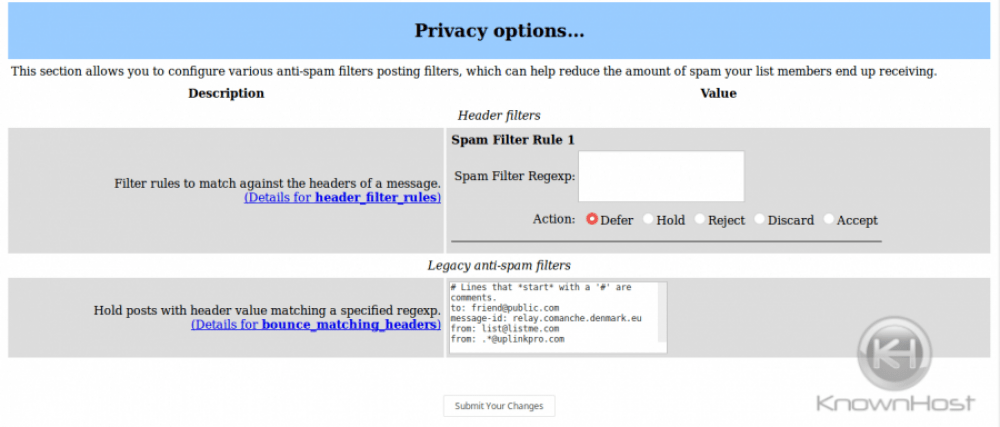
It would be wise to also configure a spam filter for your mailing list. If your account containing the mailing list were to become compromised, having SpamAssassin filter outgoing mailing list emails would be wise to try to limit spam sent as much as possible, especially considering how much effort it takes to properly configure ad maintain a mailing list with a good IP reputation. This can be done via cPanel » Home » Email » Mailing Lists.
Scroll down to the section Current Lists and click Manage next to the list you need to create the filtering for:
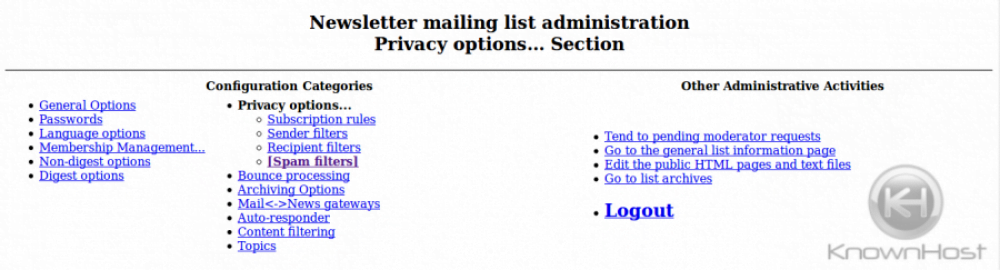
Under Configuration Categories, click Privacy options… and then click Spam filters:
Scroll down and add the spam filtering as desired:
SMTP
By default, WordPress uses the PHP mail function to send emails generated by WordPress or any contact plugin. This will cause your emails to be sent from “root@serverHostName.tld” rather than an actual email address. This can make your emails more difficult to authenticate, thus likely to end up in the recipient’s spam box. Because of this, you should always configure your emails to be sent via SMTP (Simple Mail Transfer Protocol). SMTP increases email deliverability by using proper authentication. There are plugins that facilitate this for popular CMS platforms like WordPress. Please refer to the section below regarding “SMTP via SMTP_ALLOWUSER” if you will be sending emails via a script on your site on how to best configure this in your firewall (CSF/LFD is default on KnownHost servers).
Security
Many spam campaigns’ primary purpose is to entice a user to perform some action that will result in their credentials being stolen or malware being distributed to the user. Some emails will make promises that are ‘too good to be true’ in order to entice the recipient to click on a malicious link. If you don’t want to lose credibility with your clients/subscribers or site visitors, you will want to secure your sites against vulnerabilities that would allow spam like this to be sent from your server. You will also want to force all cPanel users to use strong passwords for all services possible to prevent their passwords from being bruteforced/guessed. If an attacker is able to still bypass these protections via 0-day exploits (new exploits that were just discovered), then you will want to have other protections in place to vastly limit the amount of spam that does get sent, as well as install a firewall that will alert you if large numbers of emails are being sent. You can also prevent your users from creating accounts using certain domains in cPanel, such as those that include ‘paypal’, ‘bankofamerica’, ‘att’, or other domains that may be used for phishing campaigns. (Home »Server Configuration »Tweak Settings under the Domains tab).

Keep site software updated and use Strong Passwords
The 2 most common ways that spamming occurs is via either weak passwords or via outdated, insecure site software. We’ve already mentioned the importance of forcing your users to use strong passwords. Now we must discuss the importance of keeping site software updated. It isn’t enough to just upgrade WordPress, Joomla, Drupal, etc installations alone. You must also upgrade the themes, addons, plugins, extensions, components, etc that are used by the site. Core CMS files are usually secure and typically are not the cause of the exploit. The vulnerability usually lies with poorly coded or outdated software addons. Thus, it is imperative to only use these third-party software components if they are from a trusted, notable source and then keep them updated.
Required Minimum Password Strength Configuration
Unfortunately, 2FA will only work for WHM and CPanel logins, not email logins. The best option for preventing compromised email accounts would be this setting.
This feature allows you to define minimum strengths for passwords for all of cPanel & WHM’s features that require password authentication. The system rates password strength on a scale of 0 to 100, where 100 represents a very strong password.
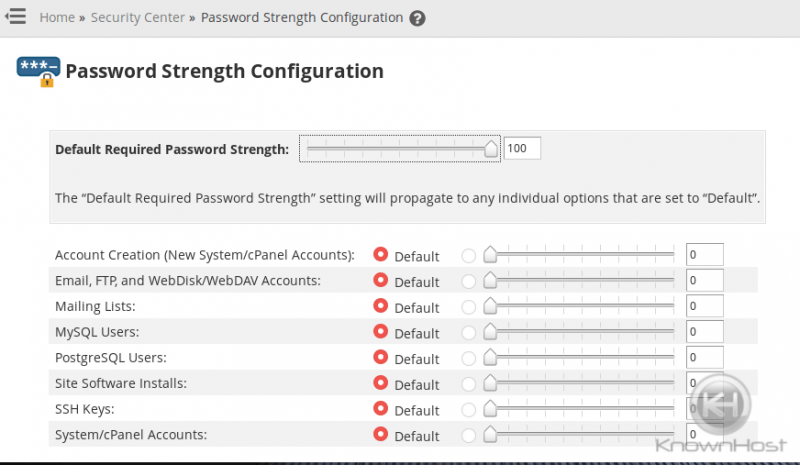
I’d recommend forcing a very strong password, especially if compromised email passwords has been a reoccurring issue.
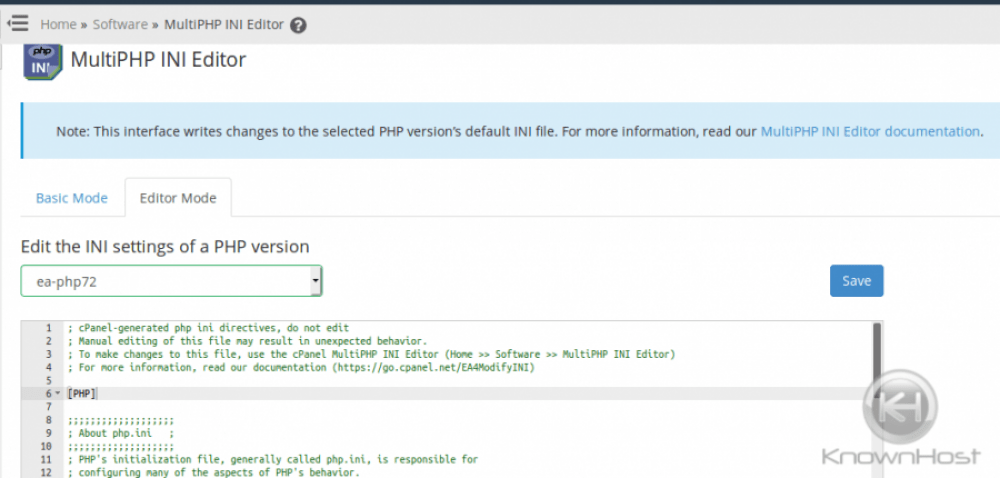
Secure PHP
There are some recommended configuration changes that should be made on the server to ensure that your PHP installation(s) stay secure. These are described in the following table and can be done via WHM » Home »Software »MultiPHP INI Editor.
| Setting | Recommended value | Recommended to prevent/limit… |
| open_basedir Tweak | enabled | LFI (local file inclusion attacks) |
| allow_url_fopen | off | RFI (remote file inclusion attacks) |
| allow_url_include | off | RFI (remote file inclusion attacks) |
| display_errors | off | Information Disclosure |
| file_uploads | off | Malicious script uploads |
| session.cookie_httponly | session hijacking via JS cookie access | |
| expose_php | off | PHP version information disclosure |
Most of these settings can be found in WHM via Home »Software »MultiPHP INI Editor in either the Basic Mode or the Editor Mode after selecting the PHP version in the drop-down to make the changes for.
You may also want to disable some PHP functions that are commonly used in malicious scripts, which can be done by adding the desired functions like the following in a comma-delimited list in the Multi INI Editor for the setting disable_functions:
- show_source
- system
- shell_exec
- symlink
- parse_ini_file
- passthru
- popen
- proc_open
- exec
- eval
- curl_exec
- curl_multi_exec
- allow_url_fopen
You may also want to enable the following option via WHM > Home »Server Configuration »Tweak Settings under the Mail tab:
Prevent “nobody” from sending mail

You should make sure to secure PHP/CGI script execution. LSAPI is now an option from cPanel & WHM version 78 and higher. If you must use another PHP Handler, make sure to consider security when doing so and make configuration adjustments as needed to ensure that processes run as the user instead of as Nobody. Use RUID or MPM ITK with DSO, or suexec with suphp, cgi, or fcgi. You should make sure to use proper, restrictive permissions and ownership settings. In most cases recommended here, the ownership on both files and directories should the set to user.user and the permissions for files to 644 and for directories to 755.
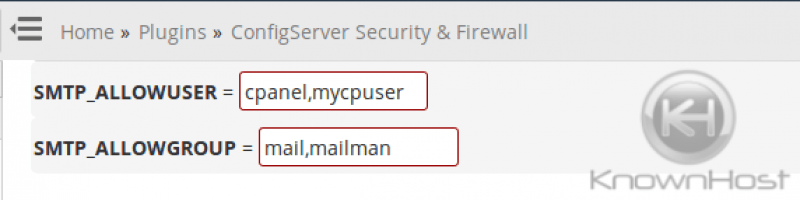
Be conservative with SMTP via SMTP_ALLOWUSER
CSF/LFD on KnownHost servers by default disables SMTP to protect our uses from unauthorized spam sent via scripts. It is best to leave this feature disabled if you do not require it in order to protect yourself from spam scripts that may have been uploaded via a site vulnerability. If you must enable SMTP, you have the option to do so only for the user that requires it rather than all users. To accomplish this, you would add the cPanel username of the user you need to enable SMTP for to the SMTP_ALLOWUSER list in /etc/csf/csf.conf but leave SMTP_BLOCK set to “1” (enabled). This way, all users are blocked from using SMTP except for those listed via SMTP_ALLOWUSER. In doing so, you will be applying good security protocol (Principle of Least Privilege), which will help prevent spam incidents via SMTP on your server.
You can edit the CSF/LFD configuration via SSH via file /etc/csf/csf.conf and the restart the firewall via csf -ra or you can make these changes in WHM via Home »Plugins »ConfigServer Security & Firewall under the section csf – ConfigServer Firewall. You will click the Firewall Configuration button to access the configuration file.
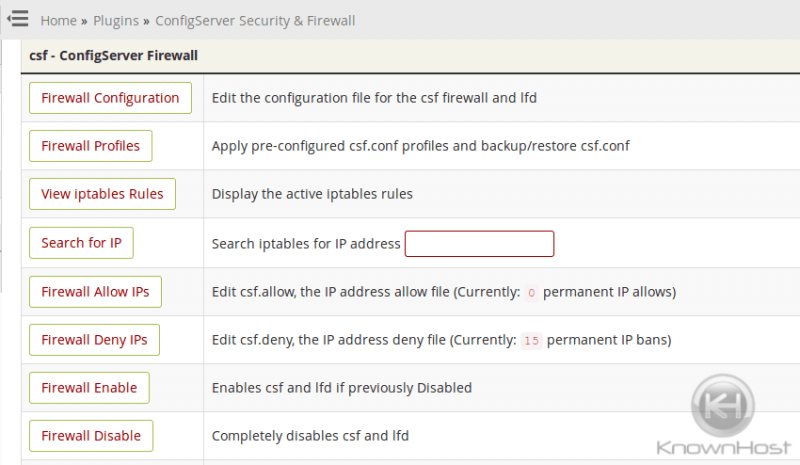
Clicking this will open the configuration file. Search for SMTP_ALLOWUSER and add a comma and the cpanel user behind cpanel, then save and restart the firewall.
Do note that there is also an option to disable SMTP via WHM, however, you do not want to use this option if you are using CSF/LFD firewall because they are incompatible and CSF/LFD allows you more configuration options via SMTP_ALLOWUSER and SMTP_ALLOWGROUP anyway. If you restart the firewall and see the following warning, then you need to disable this Tweak in WHM and just use the option in CSF/LFD:
*WARNING* The option “WHM > Tweak Settings > Restrict outgoing SMTP to root, exim, and mailman (FKA SMTP Tweak)” is incompatible with this firewall. The option must be disabled in WHM and the SMTP_BLOCK alternative in csf used instead
Hold Users Accountable
If you notice that the same users’ emails are being exploited repeatedly, you may want to have them scan their devices with malware scanners to see if there is any malware on their devices that may be harvesting their passwords.
Enable cPHulk
While cPHulk is a good option; we do not recommend it to be used in tandem of ConfigServer Security & Firewall.
As such; it is disabled by default on KnownHost Servers.
cPHulk is a service that provides protection for your server against brute force attacks. A brute force attack is a hacking method that uses an automated system to guess the password to your web server or services.
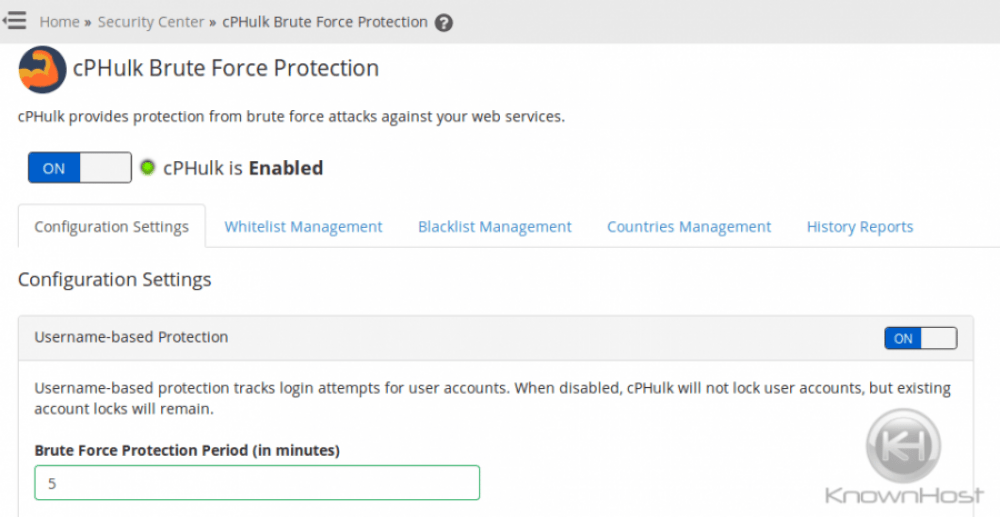
cPhulk monitors the following web servers and services:
- cPanel services (Port 2083).
- WHM services (Port 2087).
- Mail services (Dovecot and Exim).
- The PureFTPd service.
- Secure Shell (SSH) access.
When cPHulk blocks an IP address or account, it does not identify itself as the source of the block. Instead, the login page displays the following warning message: The login is invalid.
Captcha and reCaptcha
Be sure to secure all “Contact Us” forms and similar on your website as these can be abused to send spammy emails. Using reCaptcha is recommended over Captcha.
Check with your preferred CMS software as they may have their own methods to implement reCaptcha, much like WordPress has many plugins to implement this.
Symlink Protection
Disabling Symlinks via Apache can help prevent symlink attacks and exploitation using this type of attack for spam purposes. The best method available currently for this is the Kernelare Symlink Protection Patchset
Other Settings
EXPERIMENTAL: Rewrite From: header to match actual sender
Enabling this option in WHM » Home » Exim Service Configuration » Exim Configuration Manager is most helpful for helping you track spammers via the logs because any local cPanel user can use the 127.0.0.1 IP address to send mail without authentication. CSF/LFD alerts rarely give any information regarding the spammer with this type of abuse, either. This option is useful in tracking abuse because it will log that the sender has been rewritten from localhost to the actual sender, thus helping mail server administrators identify the source of spam more efficiently and faster.
Require Strong Ciphers and Protocols
You can adjust the ciphers list in the SSL/TLS Cipher Suite List field in WHM’s Exim Configuration Manager interface (WHM » Home » Service Configuration » Exim Configuration Manager). The Options for OpenSSL setting determines the allowed SSL/TLS protocols.
You can manually update the values or you can select the default values if you’ve been keeping cPanel updated regularly (KH enables automatic updates on cPanel/WHM). cPanel’s recommend settings are typically the settings recommended for PCI compliance and are very secure.
You can test and confirm that your protocols and ciphers have been set as desired using the following command (you must replace HOSTNAME below with the server’s actual hostname or IP):
nmap HOSTNAME -p 587 --script ssl-enum-ciphersSMTP via TLS/StartTLS uses port 587 while SMTP via SSL uses port 465. You may also want to test other mail server ports such as IMAP via SSL uses port 993 and POP3 via SSL uses port 995.
The output will resemble something like this if you only support TLS1.2 via port 587:
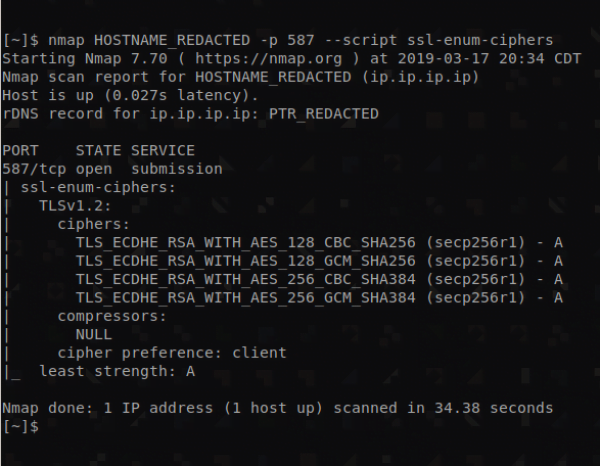
It should be noted that TLS 1.2 is only supported in modern mail clients.
Mail clients such as:
- Outlook 2007.
- Outlook 2010.
- Outlook 2013.
- Outlook 2016.
May not support TLS 1.2.
Update to enable TLS 1.1 and TLS 1.2 as default secure protocols in WinHTTP in Windows
Secure Mailman
Mailman is available via port 80 and thus, cPanel/WHM’s forced HTTPs redirect for all cPanel, WHM, and Webmail connections does not apply. If you have Mailman running on your server, then you can access the admin interface via the insecure HTTP URL like so:
domain.tld/mailman/admin/mailman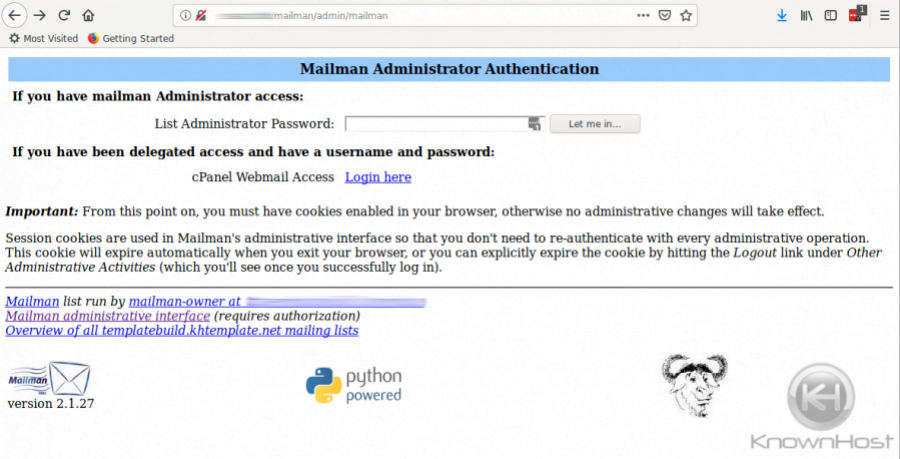
This means that this publicly facing Mailman interface can be bruteforced or have the admin credentials stolen via unencrypted network traffic if you actively use it to log in. This interface is still accessible even if mailman is disabled in WHM’s Service Manager. You may also want to disable Enable Mailman mailing lists in WHM’s Tweak Settings as well.
If you do not use Mailman, disable it via WHM’s Tweak Settings and the Service Manager.
According to cPanel documentation, you can disable web access to Mailman by creating the file /usr/local/cpanel/3rdparty/mailman/cgi-bin/.htaccess with the following content:
  <Limit GET POST>
    order deny, allow
    <deny from all>
  </Limit>

  <Limit PUT DELETE>
    order deny, allow
    <deny from all>
  </Limit>
If you do use the Mailman admin interface via URL “/mailman/admin/mailman”, you can choose to force it to use HTTPS as long as the site used to access it has a valid SSL installed (the site’s SSL will be used for this since access to the Mailman admin interface occurs over port 80). Mailman provides instructions to accomplish this via the Mailman configuration file mm_cfg.py, but cPanel may overwrite these configuration files with subsequent Mailman updates. Due to this, I would recommend instead using an .htaccess to force .htaccess. You would create the file /usr/local/cpanel/3rdparty/mailman/cgi-bin/.htaccess with the following content:
  RewriteEngine on
  RewriteCond %{HTTPS}        off [NC]
  RewriteRule ^/mailman(/.*)  https://%{HTTP_HOST}/mailman$1   [L,R=permanent]
Do note that your Apache configuration may not support the .htaccess file located under /usr/local/cpanel/3rdparty/mailman/cgi-bin/.
Hold All Email for An Account Suspected of Spamming
You can choose any of 3 actions to take on a potential spammer via this Tweak Setting:
- Take no action
- Hold outgoing mail
- Reject outgoing mail
The default value is 500 and is determined by the Tweak Setting Number of unique recipients per hour to trigger potential spammer notification.
Suspend Repeat Offenders Email Only (Websites Still Available)
You can choose to suspend email accounts and leave the domain operational. You may choose to do this for accounts you host that have multiple policy violations and spam occurrences. Alternatively, if you begin receiving LFD firewall “AUTHRELAY” alerts for a particular account, you can suspend any further logins until you investigate further to determine whether the password was compromised or not.
Track email origin via X-Source email headers
This feature adds X-Source headers to email messages to track the origin of messages sent through your mail server and can be found in WHM’s Tweak Settings.