Troubleshooting MySQL Connection Errors
Last Updated: January 22, 2026
If you are experiencing database connection errors, then look no further for troubleshooting assistance! This guide details the common causes of the dreaded Database connection error, how to find the root cause, and what to do to fix it. The commands in this article work with MySQL or MariaDB on CentOS 6 or 7 cPanel servers.
I know that this is a frustrating time, and you are rushed to fix your website, so I’ve listed below the most common causes for the Database Connection Error in order of prevalence to help you find and fix this as quickly as possible (don’t worry, we will discuss how to troubleshoot each of these in detail):
- Out of Memory errors are killing MySQL
- Disk space is exceeded and no further writes can be made to the database.
- Max_connections setting is exceeded.
- MySQL is failing due to a syntax error, is corrupted, or has crashed tables.
- Invalid or mismatched credentials in the site’s database configuration file as compared to those stored in cPanel/MySQL.
- PHP was upgraded, but the site isn’t yet compatible with PHP 7 (still uses the deprecated function mysql_connect).
- There are missing PHP Modules to handle SQL connections.
The first thing you should ask yourself when you have this error is, “Is the error persistent or intermittent?”. Second, “Is this occurring for all sites or just one?”.
If the error is intermittent, check for the following:
- OOMs
- Max_connections being exceeded
If the error is persistent but occurs for all sites, check the following:
- Disk space exceeded
- Whether MySQL is running, has crashed tables, or has InnoDB corruption.
- here are missing PHP Modules to handle SQL connections (rarely seen issue).
If the error is persistent, but only occurs for one site, check the following:
- Invalid or mismatched credentials in the site’s database configuration file as compared to those stored in cPanel/MySQL.
- PHP has been upgraded, but the site isn’t yet compatible with PHP 7 (still uses the deprecated function mysql_connect).
This article discusses in detail how to deal with the following variations of errors you may see logged in different locations in your server:
- Max Connections Exceeded
- main process exited, code=killed, status=9/KILL
- Out of memory in UB ####: OOM Killed process PID (service) score 0 vm:#####mb, rss:#####mb, swap:0kb
- Killed process PID (service) score ### or sacrifice child
- mmap() failed: [12] Cannot allocate memory
- service invoked oom-killer
- OOM killer in rage, # tasks killed
- [ERROR] mysqld: Table ‘./database_name/wp_revslider_css’ is marked as crashed and should be repaired
- myisamchk: error: Can’t create new tempfile: ‘./DATABASE_NAME/TABLE_NAME.TMD’
- The system failed to open the session file “/var/cpanel/sessions/raw/root:########” because of an error: Disk quota exceeded at /usr/local/cpanel/Cpanel/Session.pm line 277.
Out of Memory Errors
If the error is intermittent, you should check for OOMs, or Out of Memory errors. To check for OOMs, you can run the following command:
grep -i 'kill\|oom' /var/log/messagesYou may see output with errors similar to these:
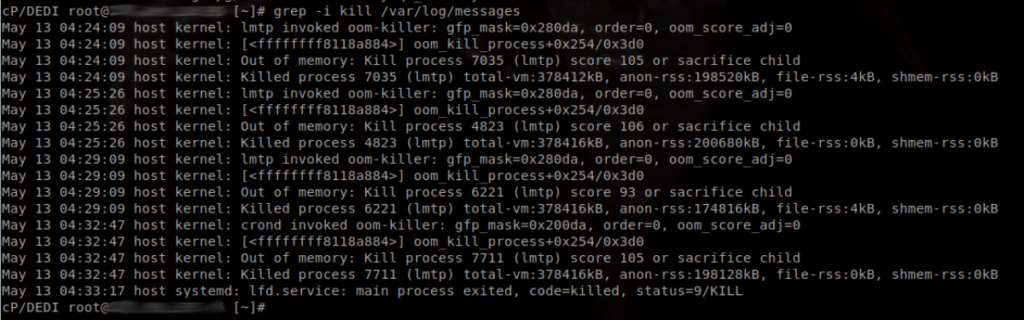
If this is the case, then you should immediately check your domlogs (domain access logs) for abuse, such as WordPress login brute forcing, XMLRPC abuse, or DoS attacks. Please don’t hesitate to ask KnownHost support for help with this if you are experiencing Out of Memory errors!
If no abuse is occurring, you may want to check the output of sar to determine how long they have been occurring so that you can determine whether you are running your server with insufficient RAM. Sar only stores the last 30 days of information, but will at least give you an overview of RAM usage over the last month. Here is how to check the current day’s RAM usage with sar:
sar -rThe following command can be used to check the RAM usage on the prior day dated the 13th:
sar -f /var/log/sa/sa13You can use the above command to check any day of the last 30-31 days by replacing ’13’ with the date that you want to check. If ‘dd’ represents the day, then the following is a generalization:
sar -f /var/log/sa/saddJust replace ‘dd’ with the day of the month that you want to review RAM usage.
Also, you can use the following command to check for the total number of OOMs that have occurred on your VPS (this command doesn’t work for non-virtualized containers):
grep oom /proc/user_beancountersThe last number listed is the count of OOMs. If no OOMs have occurred, then your output will look like this:

If OOMs have occurred, as in the case of the following server which has had 126K, you will see the number of OOMs that have occurred:

If OOMs are occurring too frequently to be logged via /var/log/messages, then you will want to watch this number. This does sometimes occur where OOMs are happening but are not being logged on the server, though the fail count is logged to /proc/user_beancounters.
If you do find abuse, depending on the type of abuse occurring, you can take several actions. You can hide the wp-login.php, disable access to xmlrpc.php file, block ‘bad’ bots, block IPs from which the abuse is originating from (if the abuse is originating from one to few IPs), and consider a service such as Cloudflare that offers protection from DoS attacks and will help to reduce your RAM usage. These would be resolutions to the most common types of abuse we see.
If you’ve found no abuse occurring, you may consider adding more RAM or disabling RAM-intensive services they may not be needed or in use (cPanel-Solr and Clamd are not required and are known to require a lot of RAM).
You may also check for multiple instances of the same service running. A recent bug in cPanel causes many OOMs due to multiple instances of tailwatchd being instantiated repeatedly. If you find something like this occurring, chances are that cPanel is aware and have released a patch, so you can stop those services, remove them from the Service Manager for long enough to run an update, and then add the service back to the Service Manager once the update completes. If the issue persists, please open a support request with the KnownHost support team.
Exceeded Disk Space
To find out if the disk space is exceeded, run the following command via SSH as root:
df -hYou will see something similar to this showing that you have reached 100% disk space utilization, or are within MB of doing so:

Or try to log into WHM. The following error is typically shown when you have exceeded your disk space and try to access WHM:
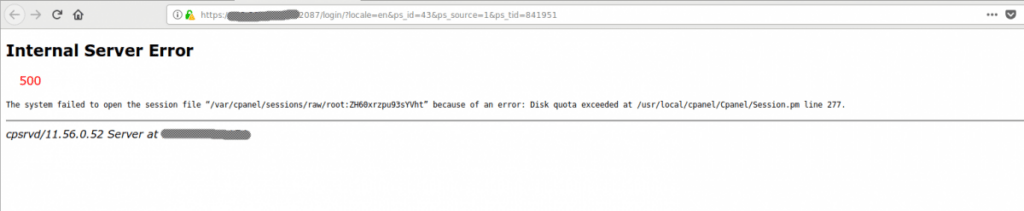
When your disk space is exceeded, you can only correct it by accessing via SSH. If you are uncomfortable with SSH, open a support request with KH support setting the priority Critical, and we will work quickly to find what is consuming space and get you back online.
You can use the following command to find what directory beneath root is using the most disk space:
du -Hhsc --exclude virtfs /*You will get output similar to this:
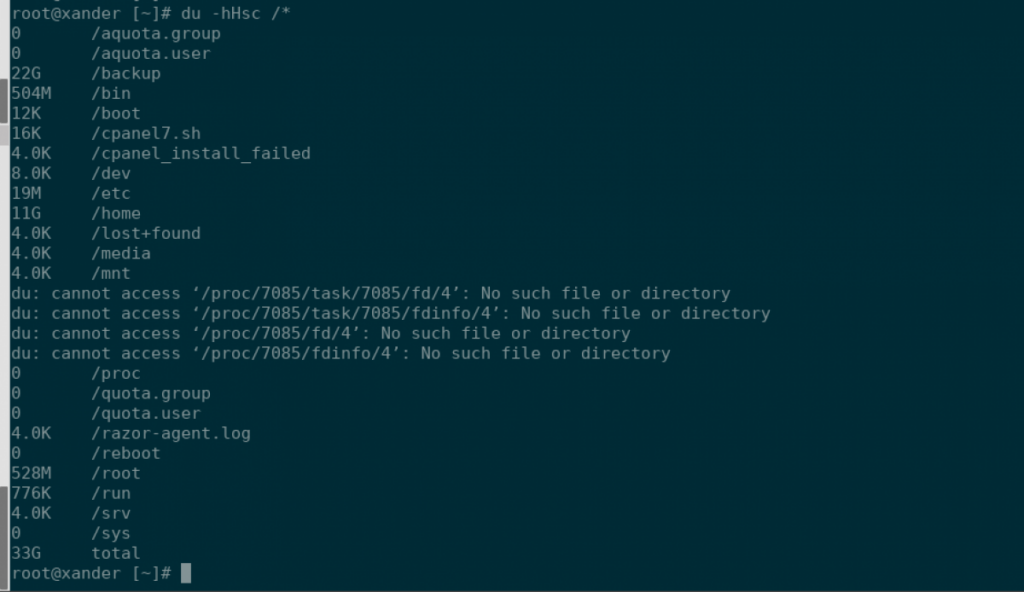
For this particular server, you can see that 22G is in /backup, and 11G in /home. If you wanted to look further into what is in /home, you can do so as follows:
du -Hhsc --exclude virtfs /home/*If you find that most of the disk space under /home is under one account, let’s say, account ‘cpuser’ you could then look under that account as follows:
du -Hhsc --exclude virtfs /home/cpuser/*And then, if you find that the disk space under that account is mostly due to mail, you could find what email account is responsible with the following:
du -Hhsc --exclude virtfs /home/cpuser/mail/*Thus, you can get an idea of what is consuming the most space by examining the largest directories on the server using the du command.
Note: The reason for the –exclude virtfs tag above is so that virtfs output is not included. The reason is that virtfs will show a lot of space being consumed, however, space is not actually consumed. The /home/virtfs consists of bind mounts. and does not actually take up disk space, even though it will show up as used disk space when you use du. Do not use rm or try to delete the /home/virtfs directory as doing so will also delete the content that it is mounted to and potentially render your server non-functional! If you want to remove these mounts, see the following link:
documentation.cpanel.net/display/68Docs/VirtFS+-+Jailed+Shell
Max Connections
To find out whether MySQL’s configured max_connections are exceeded, you can compare the output of the following commands:
  mysql -e "SHOW STATUS" | grep -E 'Max|Upt'
  grep "max_con" /etc/my.cnf
You’ll see output similar to the following:
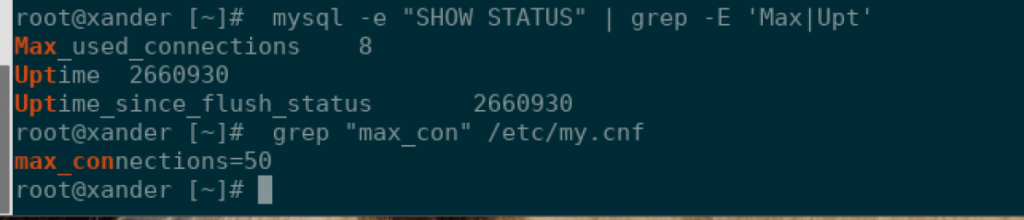
If the value of Max_used_connections from the first command is the value of max_connections + 1 or more, then the max_connections for MySQL have been exceeded. For example, if the Max_used_connections is 51 but the max_connections is 50, then you did exceed your max_connections. As long as traffic looks legitimate and you have sufficient RAM to support the increase, you can increase this setting in the MySQL configuration file by doing the following:
1) edit /etc/my.cnf and change the setting as desired, but do so in small increments as not to exhaust your RAM 2) restart MySQL
This can be accomplished with the following commands:
nano /etc/my.cnfCtrl X to exit. You will be prompted to confirm the changes and the file name. Finally, restart MySQL:
service mysql restartPHP
Did you recently upgrade PHP to version 7? If so, you will want to check the site for the function mysql_connect. This function has been deprecated, and the site software will need to upgraded to be compatible with PHP 7, ( use mysqli_connect instead). You can run the following search via SSH in your site’s document root to check:
grep -Rli mysql_connect.Regarding Missing modules, this is rarely an issue. However, these are the modules often use to establish a database connection (varies depends on what EasyApache/CustomBuild and PHP versions you are using):
- mysqli
- mysqlnd
- pdo_mysql
- pdo_sqlite
- sqlite3
Database Credentials Mismatch
Another possible cause is that there could be invalid or mismatched credentials in the site’s database configuration file as compared to those stored in the panel/MySQL. This often occurs when a migration is done and you were previously using the old, less secure, MySQL password hashing. cPanel will change the passwords to a secure, random password using the new password hashing format to provide you with utmost security, however, you must update the passwords in cPanel to match those as present in your configuration files after this is done.
The following lists the locations (path is relative to the installation’s root) of the configuration files that stores the database credentials for several popular CMSs:
- WordPress – wp-config.php
- Drupal – sites/default/settings.php
- Joomla – configuration.php
- Magento – app/etc/local.xml
- OpenCart – admin/config.php
- phpBB – config.php
- Prestashop – app/config/parameters.php
- WHMCS – configuration.php
- Laravel – config/database.php
Once you retrieve the database name, username, and password from these files, you will need to log into cPanel for the domain and update the database user’s password.
- Log into CPanel at https://yourdomain.tld/cpanel
- Navigate to ‘MySQL Databases’
- Scroll down to the bottom of the page where you see the list of users
- Locate the key icon next to each user.
- Click the key icon to reset the user’s password to the password used in the configuration file.
Now you can clear your browser cache and test whether or not this has resolved your Database Connection Error.
MySQL Failure, Corruption or Crashed MyIsam Tables
Finally, the worst possible issue… MySQL failure/corruption or crashed tables. The worst case scenario isn’t that bad thanks to KnownHost and their external backup system. If MySQL InnoDB corruption cannot be repaired, we can try to restore the server to a previous backup, which may not have as much corruption, and then be successful in repairing the corruption.
To check for these errors, the first thing that must be done is to check to see if MySQL is running:
service mysql statusThen you will want to check the MySQL logs for errors as shown below:
tail -400 /var/lib/mysql/`hostname`.errThe command will show the last 400 errors. You can adjust the number of errors to show as you see fit. If your error log is in a different location you will want to adjust the command accordingly.
This should give you a clue as to what the issue is. If you are still unsure and MySQL was running in the previous check, you can tail the MySQL error logs while attempting to restart MySQL in another ssh session and this should give you more clues as to why these errors are occurring. Tail the log with this command:
tail -f /var/lib/mysql/`hostname`.errAnd, in another terminal, restart MySQL with the following command:
service mysql restartSyntax Error
If a syntax error is present in the MySQL configuration file, an error will be logged detailing the exact error. You can then edit /etc/my.cnf to comment out or place the symbol # in front of the statement with the syntax error to disable it. Then, try to start MySQL:
service mysql startIf there is no apparent syntax error and the error log fills with a lot of 0’s, .’s, and it just seems that MySQL is incoherent and drunkenly logging to the error log, then it is likely that InnoDB corruption is to blame. The logs may explicitly reference an article from MySQL about InnoDB Forced Recovery as well. If this is the case, InnoDB Forced Recovery must be done.
InnoDB Forced Recovery
MySQL may or may not be running. It may be crashing immediately upon restart and logging errors that do not make much sense. It may also be referencing a link to a MySQL article about recovering InnoDB.
IMPORTANT Make sure you have sufficient RAM and OOMs are not occurring before you recover InnoDB! Also, make sure you remove MySQL from the Service Manager before you perform any of the recovery steps below, and then be certain to reverse this once you have recovered InnoDB! You can toggle ‘monitored’ on and off using a WHM API command. The command below turns it off (replace the ‘0’ with ‘1’ for ‘monitored’ to re-enable):
whmapi1 configureservice service=mysql enabled=1 monitored=0The first thing you’ll want to do is open a second terminal and watch the MySQL error log as you force InnoDB recovery. You can watch the error log using the following command:
tail -f /var/lib/mysql/`hostname`.errWatching the error log while performing the steps below will allow you to determine whether InnoDB corruption has been repaired or not because you will no longer see the error that indicates InnoDB corruption is present and MySQL will be working again.
If MySQL is stopped, you may also want to run the following before you start just to make sure that no crashed MyISAM tables prevent your mysqldumps from completing:
myisamchk -rf /var/lib/mysql/*/*To perform Forced InnoDB Recovery, you must do the following:
- edit the /etc/my.cnf file and add the following: innodb_force_recovery=1
- try to start MySQL if it is not yet running
If MySQL fails to start, try proceeding to innodb_force_recovery=2. You can go all the way to 6, but you want to start with the lowest possible value. The higher the value of innodb_force_recovery, the more data loss likely to occur.
If MySQL starts, then proceed with the following steps:
mysqldump --all-databases > /root/support/alldbs.sqlNow, stop MySQL:
service mysql stopWhile stopped, do the following:
  mkdir -p /root/support/mysql-bak/
  mv /var/lib/mysql/* /root/support/mysql-bak/
  cp -pr /root/support/mysql-bak/mysql/ /var/lib/mysql/
Now, edit /etc/my.cnf and comment out (place the symbol # in front of) innodb_force_recovery=1.
  service mysql start
  mysql < /root/support/alldbs.sql
If MySQL still fails, try repeating Innodb forced recovery with a higher setting. If you reach 6 without success, you may want to request that the support team restores /var/lib/mysql from a previous date when the corruption is hopefully not as bad, and then re-attempt InnoDB forced recovery.
If you see neither of the errors above (syntax errors nor InnoDB corruption), you can check for crashed MyISAM tables.
Crashed MyIsam Tables
To check for crashed MyISAM tables, run the following command, and if errors are present, check that the date for which they are present is, in fact, the current date (cPanel will detect and automatically fix crashed tables for you in most cases, which is why you would need to check the date of the errors):
grep -i crash /var/lib/mysql/`hostname`.errYou will see errors such as this:
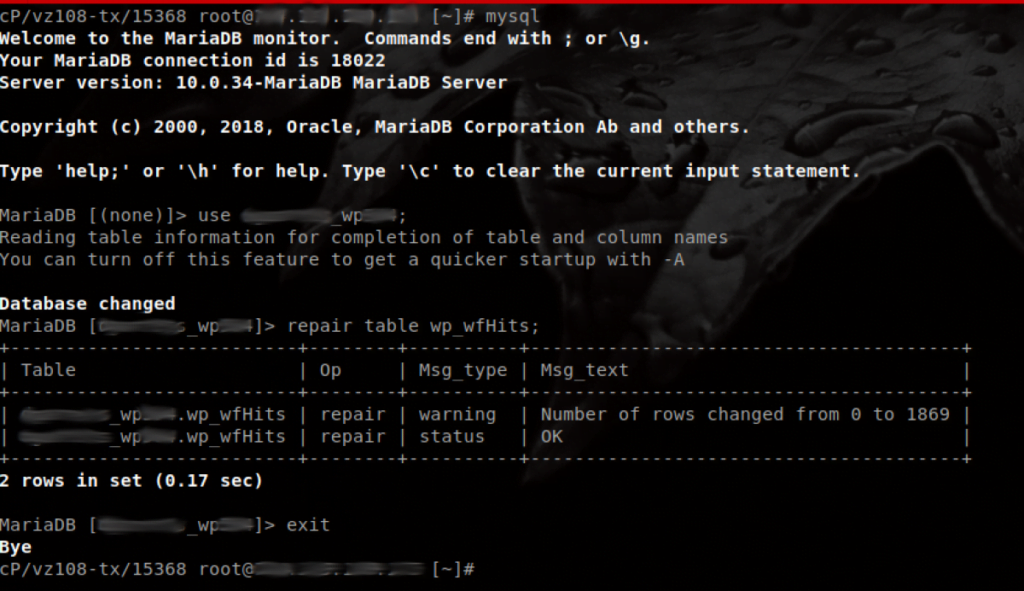
[ERROR] mysqld: Table './database_name/wp_revslider_css' is marked as crashed and should be repairedFortunately, repairing MyISAM tables is actually pretty easy. You can do so by running the following commands:
  mysql
  use DATABASE;
  repair table TABLENAME;
  exit;
IMPORTANT Make sure you have sufficient RAM and OOMs are not occurring before you repair your tables!
You could even use the following alternate means to repair the table as well:
myisamchk --recover TABLENAMEOr the following to repair the database:
mysqlcheck --repair --databases DATABASENote that myisamchk can be run while MySQL is not running, whereas mysqlcheck and repair table can only be run while MySQL is running.
You will replace DATABASE with the database’s name, and TABLENAME with the table name. You get these directly from the error logged above, which is in the format:
yymmdd hh:mm:ss [ERROR] mysqld: Table ‘./database_name/table_name’ is marked as crashed and should be repaired
Here is what this type of repair looks like:
Occasionally, this repair will fail due to a temporary table. The error will read something similar to this:
myisamchk: error: Can't create new tempfile: './DATABASE_NAME/TABLE_NAME.TMD'Here is what this error looks like when you encounter it after attempting to repair a table via the MySQL CLI:
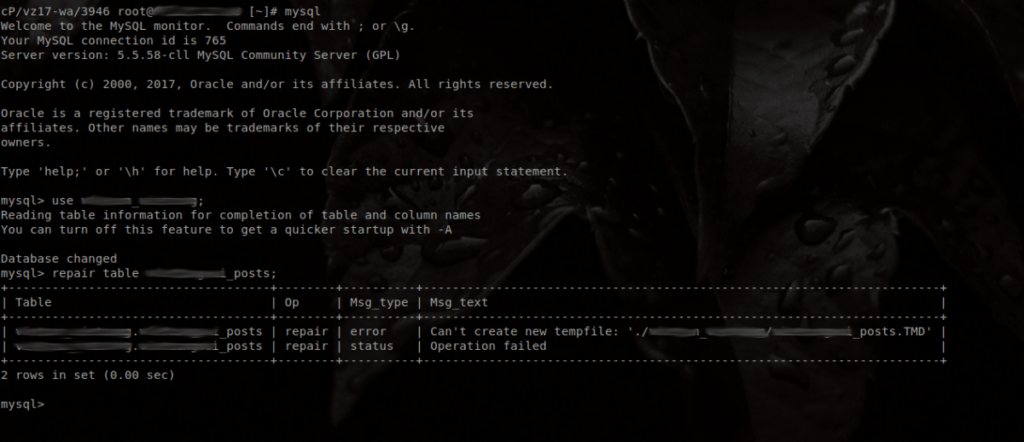
Note that ‘TMD’ will actually be capitalized in your server, whereas the actual ‘/DATABASE_NAME/TABLE_NAME’ will be lowercase.
If this occurs, you will need to remove the temporary table. I prefer to rename it to preserve the copy, which can be done via the following command:
mv /var/lib/mysql/DATABASE/TABLENAME.TMD /var/lib/mysql/DATABASE/TABLENAME.TMD.bakYou should now be able to run the repair successfully.
If you have multiple crashed tables, you can use the following command to check, analyze, optimize, and repair all tables (some of these functions only work with certain storage engines, such as repair with MyISAM):
mysqlcheck -Aa; mysqlcheck -Ace; mysqlcheck -Arv; mysqlcheck -AoYou may want to watch the error log in a separate terminal while running this command:
tail -f /var/lib/mysql/`hostname`.errIf your databases are very large, then you may want to use the screen utility to run the command above in to make sure that it can complete even if you log out:
screenConclusion
Keep frequent MySQL backups! This is very important. KnownHost does take full VPS backups for our VPS customers every other day and offers awesome backup solutions to our dedicated server clients. There are some limitations to our backups that can be overcome with cPanel backups, so cPanel backups are certainly advised.
Obviously, we wouldn’t want you to deal with these issues alone, especially if you are unfamiliar with SSH. We are here to help. If you encounter any of these issues, please submit a support request and we’ll be happy to assist. Regardless of the case, we will do our best to have your server functioning and online as soon as possible. We are here to help!