Installing Ruby on Rails Apps on a cPanel/CentOS 7 Server with EasyApache 4
Last Updated: January 23, 2026
Should you contact support regarding this article; KnownHost will only be able to assist with the initial installation of ruby and/or ruby passenger packages.
cPanel deprecated Ruby on Rails in cPanel & WHM version 66 since it is not supported on CentOS 7 servers. Rails is a Ruby application, and they support Ruby applications via cPanel’s Application Manager interface (Home » Software » Application Manager), so this can technically be done. However, I cannot promise that it will run seamlessly forever since cPanel’s Ruby implementation has changed quite frequently in the past.
Let’s install Rails.
Quick Start for Ruby on Rails Installation Guide
For those of you who prefer a quick-start and are comfortable running commands as root via SSH, see below.
As the user root via SSH (remember that KnownHost uses port 2200 by default for SSH), run the following:
  yum -y install ea-ruby24-mod_passenger ea-ruby24-ruby-devel ImageMagick-devel sqlite-devel ea-apache24-mod_env ea-ruby24-rubygem-passenger ea-ruby24-rubygem-rack ea-ruby24-rubygem-rake ea-ruby24-rubygem-sqlite3
  curl --silent --location https://rpm.nodesource.com/setup_8.x | bash -
  yum -y install nodejs
scl enable ea-ruby24 'gem install bundler bundle spring uglifier turbolinks rails'Note: We must install NodeJS separately above because it isn’t available by default in the CentOS/cPanel yum repos.
Next, you will need a cPanel user to own the Rails application. If you have yet to create a cPanel account for this, you can use the following commands as the root user to create a new user, replacing the appropriate fields as desired (domain, user, password, etc). Then, modify the user to be permitted to have Passenger Apps. The last command creates the Passenger App via cPanel’s Application Manager (be sure to edit appropriately for the app you want to create):
  whmapi1 createacct username=mycpuser domain=mycpdomain.tld hasshell=1
  whmapi1 modifyacct user=mycpuser MAXPASSENGERAPPS=5
uapi --user=mycpuser PassengerApps register_application name="test_blog" path="/ruby_apps/test_blog" domain="mycpdomain.tld" deployment_mode="development" enabled="1"Note: I am using mode=”development” because I will be creating my Rails App from scratch. You would use mode=”production” if you were migrating an existing production Ruby on Rails application.
You will also need to enable compilers for the user.
usermod -a -G compiler mycpuser # replace mycpuser with your cPanel usernameThe first command below is the command that you will use to change to the cPanel user, but make sure to replace mycpuser with your actual cPanel user that will own the Ruby Application. Run the following commands in order to create a new test application called “test_blog” in the directory ~/ruby_apps/test_blog/ (feel free to change these directories as desired, but make sure to use consistent data for the commands you issue).
  su mycpuser
  cd ~
  mkdir ruby_apps
  cd ruby_apps
  echo 'export PATH=$PATH:/opt/cpanel/ea-ruby24/root/usr/bin/' >> ~/.bashrc
  echo 'export PATH=$PATH:/opt/cpanel/ea-ruby24/root/usr/local/bin/' >> ~/.bashrc
  source ~/.bashrc
  rails new test_blog
  cd test_blog
  bundle install --path vendor/bundle
Note the location that we are installing the gems in the last command (vendor/bundle). We are doing this so that this works with jailed shell.
Now, you should be able to visit the domain in the browser and load the default Ruby on Rails page. From here, you can confirm that your Ruby and RoR implementations are working and proceed to build your Rails application!
Your first application will not necessarily run on port 12001.
A Simple Ruby on Rails Script
The purpose of this script is to install all necessary software and set up a development Ruby on Rails Application for a cPanel user/account. You have the option to create a new cPanel account within this script or to use an existing cPanel user. If you choose to use an existing cPanel user, the script assumes that the domain you enter also exists already. If the domain you want to use does not yet exist, then you will need to create it in the panel before executing this script. If this script completes successfully, you should be able to visit the domain in the browser (provided you’ve set up your DNS) and load the default “Yay! You’re on Rails!” page. If an error occurs, the script *should* terminate immediately and inform you of the error, at which time, you will need to correct the error and proceed manually where the script left off with the “Quick Start” instructions above. This script has been tested with a default cPanel/CentOS 7 Knownhost server. No guarantee is given that it will continue to work with future versions of CentOS/cPanel. This script is provided only as a courtesy and without support.
You will need to run this script as the root user after you’ve placed it on your server. Location does not matter, but you will want to remember to remove the script once done. The script will prompt you to enter certain information required to create/assign the user with a directory to contain Ruby Applications, which will contain a fresh development of Ruby on Rails application that will load from the specified domain.
#!/bin/bash -e

#Confirm that the server is using EA4.

if [ -f /etc/cpanel/ea4/is_ea4 ]; then
  echo "This is an EasyApache 4 Server. Proceeding..."
else
  echo "This doesn't not appear to be an EasyApache 4 Server! Exiting due to incompatibility."
  exit 1
fi

#Gather information needed for New cPanel user creation and Rails Application Creation

echo "Will you be installing Rails for an existing cPanel user (Y/N)? If you answer 'N', then the cPanel username you enter in the next step will be created as a new user"
read input
echo "Enter cPanel username:"
read mycpuser
echo "Enter the new cPanel user's domain that you want to load the Rails Application from:"
read domain
echo "Enter the directory beneath the user's root directory in which to store Ruby Apps for this user (ex. Entering 'myrubyapps' will result in this directory from which your Rails app will be created: /home/cpanel_user/myrubyapps/):"
read ruby_apps_dir
echo "Enter the name of your Rails Application (ex. myRailsBlog  This will create a Rails application with 'rails new myRailsBlog' command, which will be stored here: /home/cpanel_user/myrubyapps/myRailsBlog/):"
read app_name

#Create new user if necessary. Run some checks against user input. May want to also check in /var/cpanel/users in case userdomains is outdated.

if [ $input == 'y' ] || [ $input == 'Y' ]; then
  grep -q " ${mycpuser}$" /etc/userdomains
  if [ $? == 0 ]; then
    echo "Using existing user $mycpuser"
  else
    echo "User not found. Is the username misspelled?"
    exit 1
  fi
elif [ $input == 'n' ] || [ $input == 'N' ]; then
  grep -q " ${mycpuser}$" /etc/userdomains
  if [ $? != 0 ]; then
    whmapi1 createacct username=$mycpuser domain=$domain hasshell=1
  else
    echo "You elected to create a new account, however this user already exists. Exiting script."
    exit 1
  fi
else
  echo "Invalid input. Please try again."
  exit 1
fi

# Install Ruby, Rails, NodeJS, and other necessary RPMs.

yum -y install ea-ruby24-mod_passenger ea-ruby24-ruby-devel ImageMagick-devel sqlite-devel ea-apache24-mod_env ea-ruby24-rubygem-passenger ea-ruby24-rubygem-rack ea-ruby24-rubygem-rake ea-ruby24-rubygem-sqlite3
curl --silent --location https://rpm.nodesource.com/setup_8.x | bash -
yum -y install nodejs
scl enable ea-ruby24 'gem install bundler bundle spring uglifier turbolinks rails'

#Edit the user to ensure that they have access to PassengerApps, create the Passenger Application, and enable compiler access for the user.

whmapi1 modifyacct user=$mycpuser MAXPASSENGERAPPS=5
uapi --user=$mycpuser PassengerApps register_application name=$app_name path="/$ruby_apps_dir/$app_name" domain="$domain" deployment_mode="development" enabled="1"
usermod -a -G compiler $mycpuser

# Execute commands as the user.  Make the Ruby Apps directory, change into it, edit the user's path for Ruby and Rails, and create the new Rails application.

su $mycpuser -s /bin/bash -c bash << EOF
cd ~
mkdir $ruby_apps_dir
cd $ruby_apps_dir
echo 'export PATH=$PATH:/opt/cpanel/ea-ruby24/root/usr/bin/' >> ~/.bashrc
echo 'export PATH=$PATH:/opt/cpanel/ea-ruby24/root/usr/local/bin/' >> ~/.bashrc
source ~/.bashrc
rails new $app_name
cd $app_name
bundle install --path vendor/bundle
EOF
Save this script is railsInstaller.sh. Then, you will be able to run it as follows:
sh railsInstaller.shIf you prefer, you could save it, make it executable, and then run it as shown below:
  chmod +x railsInstaller.sh
  ./railsInstaller.sh
Feel free to edit the script to suit your needs. If you get any errors with the script claiming that a user does not exist after selecting to use an existing user, though you are certain that the user does exist, you can try running the following command via SSH as root to ensure that /etc/userdomains is updated to include all cPanel users listed in /var/cpanel/users:
/usr/local/cpanel/scripts/updateuserdomainsExtended Installation Instructions with Screenshots
Here are the extended instructions with screenshots for those who prefer more details regarding commands to run, what they do, and what output to expect:
First, let’s log into our server as the root user via SSH (KnownHost uses SSH port 2200 by default) and install a few things via yum:
  yum -y install ea-ruby24-mod_passenger ea-ruby24-ruby-devel ImageMagick-devel sqlite-devel ea-apache24-mod_env ea-ruby24-rubygem-passenger ea-ruby24-rubygem-rack ea-ruby24-rubygem-rake ea-ruby24-rubygem-sqlite3
  curl --silent --location https://rpm.nodesource.com/setup_8.x | bash -
  yum install nodejs
This will install our Ruby packages, ImageMagick, Sqlite, mod_env, mod_passenger, and NodeJS. The last command will prompt you to confirm the packages to be installed, and then prompt you to confirm the GPG key before completing the installation (just type y and then Enter to confirm the dependencies and the GPC Key:
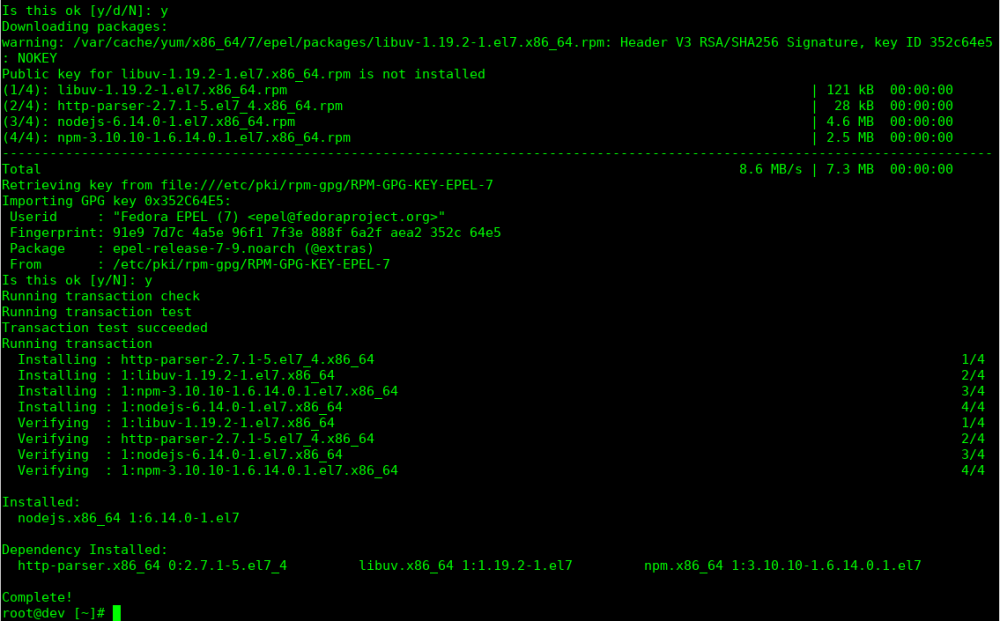
You could just run yum with the flag -y to avoid these confirmation prompts.
Let’s go ahead and install bundler.
scl enable ea-ruby24 'gem install bundler'
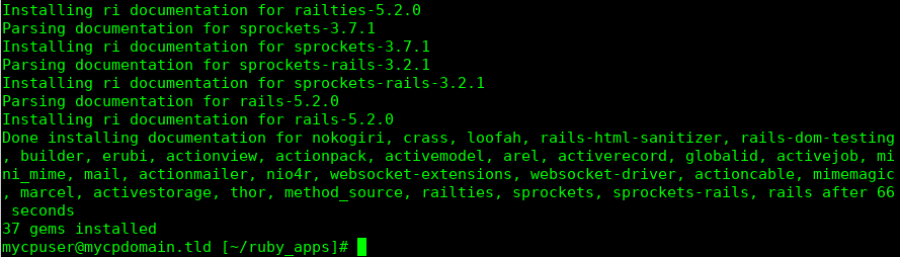
Next, let’s install a few more gems we will need:
scl enable ea-ruby24 'gem install bundler bundle spring uglifier turbolinks rails'The output is quite long, but you’ll want to watch to make sure all gems install. The last of the output should look like this (note that dependencies are also installed and I also chose to install documentation, which can be excluded with –no-rdoc –no-ri ):
Create the cPanel account for use with Ruby on Rails unless you already have an existing cPanel account that you will be using for your Rails application (be sure to replace the username mycpuser with a username you’d like to use and then the domain mycpdomain.tld with your domain that will run the Rails applicaton). Skip this step if you will be using an existing user, but make sure that your existing user has shell access if you plan to run rails commands via SSH while creating your application.
whmapi1 createacct username=mycpuser domain=mycpdomain.tld hasshell=1Note: We gave the user shell access via the hasshell=1 above. We need to make sure the user has shell access enabled, otherwise they will see the following error:

Note: You may want to make sure to set the default shell to jailed shell if you are using CentOS kernel first as a jailed shell environment increases security and makes otherwise-unavailable commands (for example, crontab and passwd) available to users. Check the shell setting with this command (jailed shell is not set by default):
whmapi1 get_tweaksetting key=jaildefaultshellAnd set it with this command if not already set:
whmapi1 set_tweaksetting key=jaildefaultshell value=1Instead, you could use WHM’s Tweak Settings interface to set the default shell (WHM » Home »Server Configuration »Tweak Settings)

IMPORTANT Do not use Jailed Shell if you are using the Cloudlinux Kernel! You should use a regular shell instead if you want to run ‘rails’ commands via SSH as the user. In this case, you would make sure that the default shell is set to ‘normal’ instead.
Allow the account to have Passenger Apps if they are not permitted to already:
whmapi1 modifyacct user=mycpuser MAXPASSENGERAPPS=5You can adjust this via WHM’s Modify an Account if you prefer the GUI (Home »Account Functions »Modify an Account).
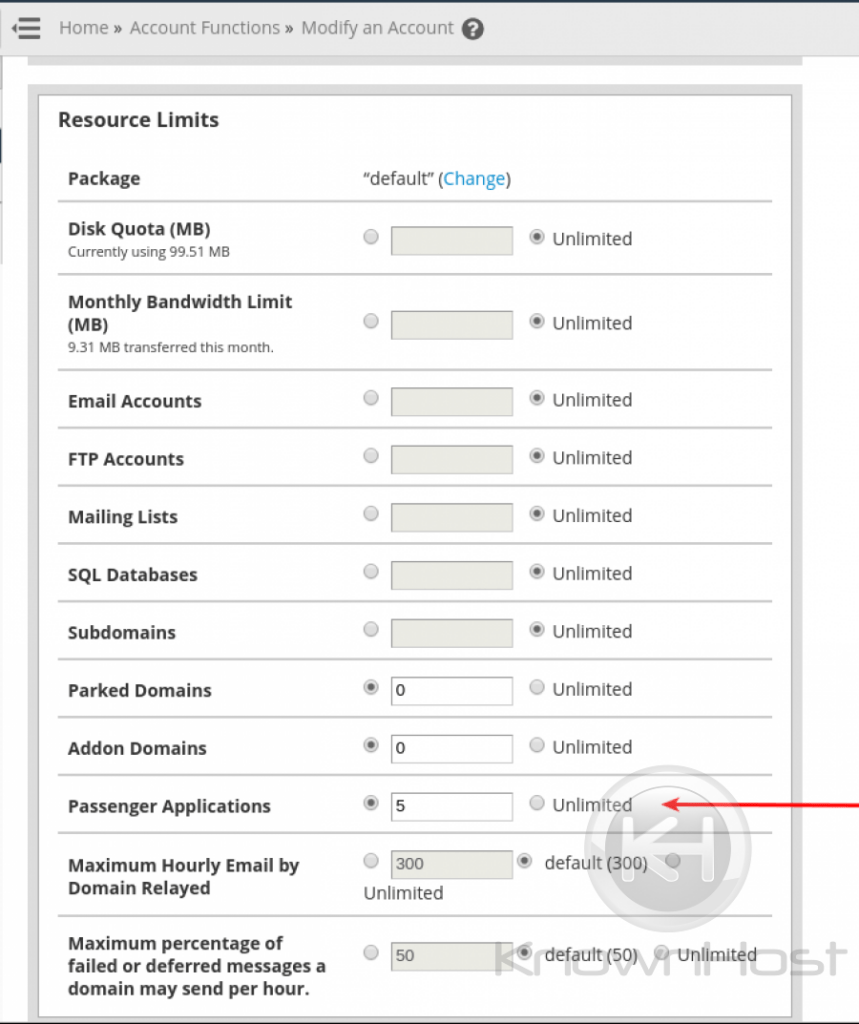
I chose to allow my user to have 5 Passenger Applications above. You may choose more, less, or unlimited.
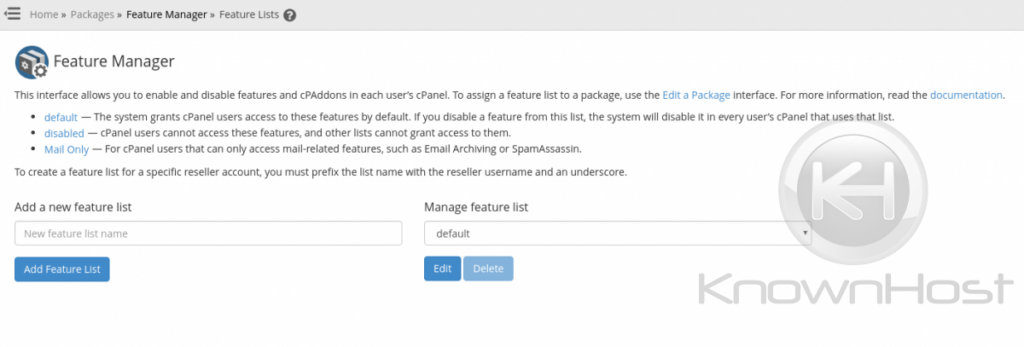
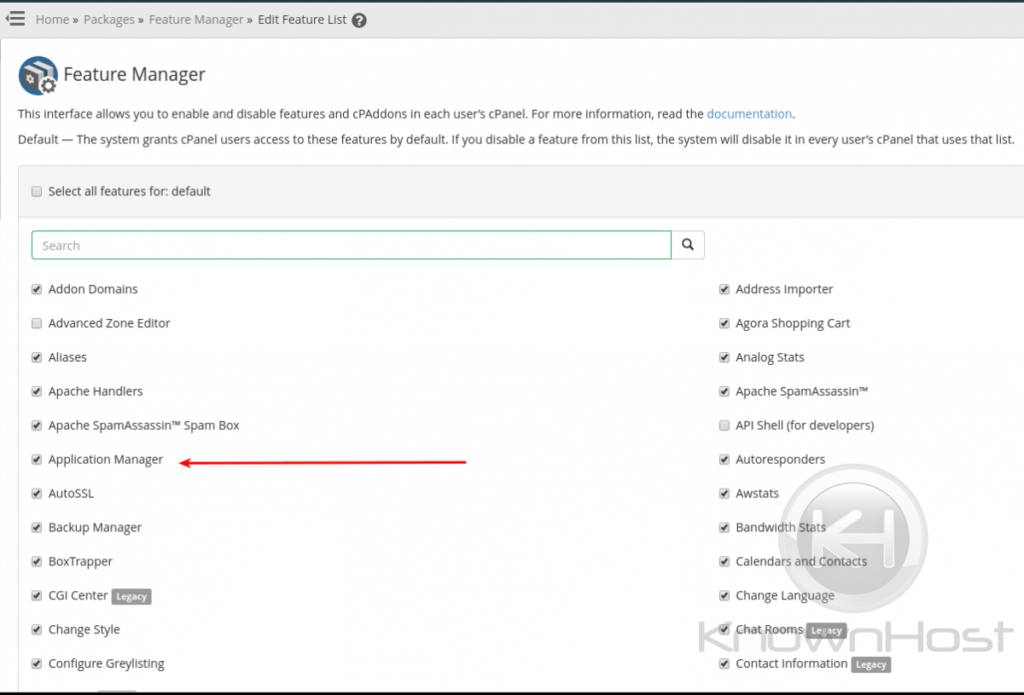
You will also want to check and confirm that, regardless of whether you chose a package or not (in which case the package will be default), that the Application Manager is available to your cPanel user’s package via WHM’s Feature Manager. You can do so via the command line like this:
grep passengerapps /var/cpanel/features/*If you see it listed, and set to ‘0’, then it is disabled for that particular Feature List. If you see no output, or see it listed and set to ‘1’, then it is enabled. You can that it is disabled on for the Mail Only Feature List on this server below:

Alternatively, you could log into WHM » Home »Packages »Feature Manager »Feature Lists and select the package to edit from the drop down list:
Make sure that Application Manager is selected:
Now, create the Ruby App for your user in cPanel’s Application Manager:
uapi --user=mycpuser PassengerApps register_application name="test_blog" path="/ruby_apps/test_blog" domain="mycpdomain.tld" deployment_mode="development" enabled="1"You will need to replace the values above with the values you’d like to use for the following keys in the command above:
- user
- name
- path
- domain
- deployment_mode
Note: I am using mode=”development” because I will be creating my Rails App from scratch. Use mode=”production” if you will be migrating an existing Rails app.
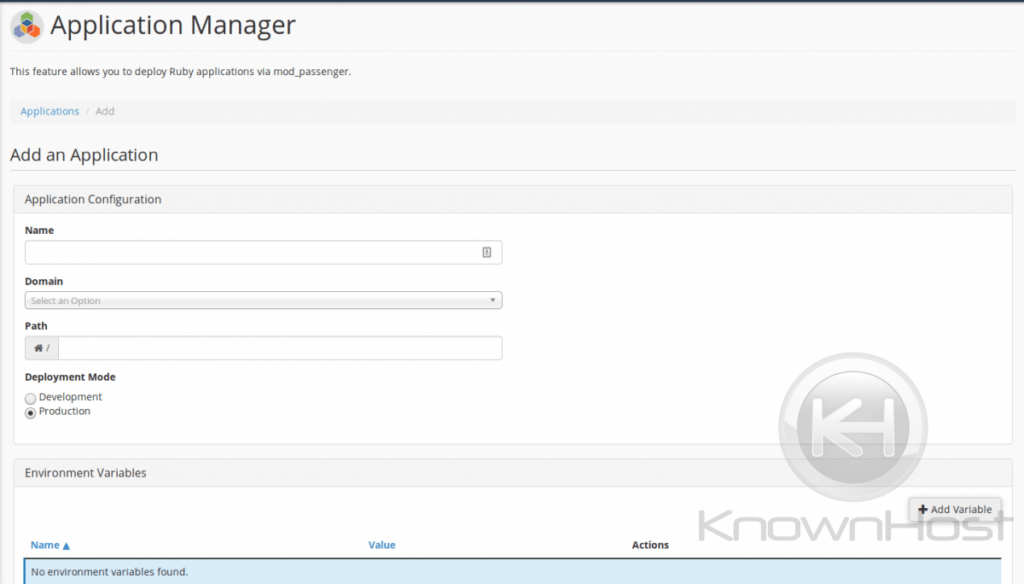
To do so from the GUI, log into the newly created (or pre-existing) cPanel account and navigate to the Application Manager and click “Add Application” to fill in the required details:
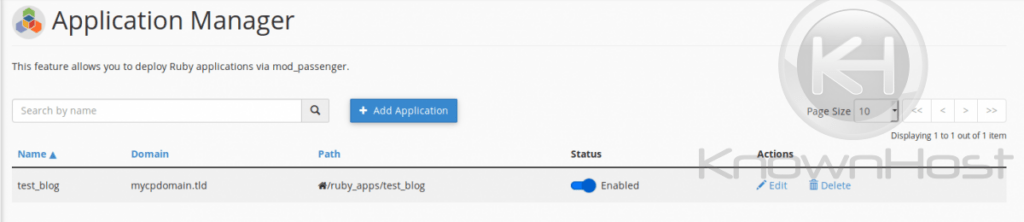
Click save. You can revisit Application Manager to ensure the application was added successfully:
Next, enable compilers. You could choose to do so globally:
chmod 755 /usr/bin/gccAlternatively, you can choose to only enable compilers for certain users (recommended) via WHM » Home »Security Center »Compiler Access
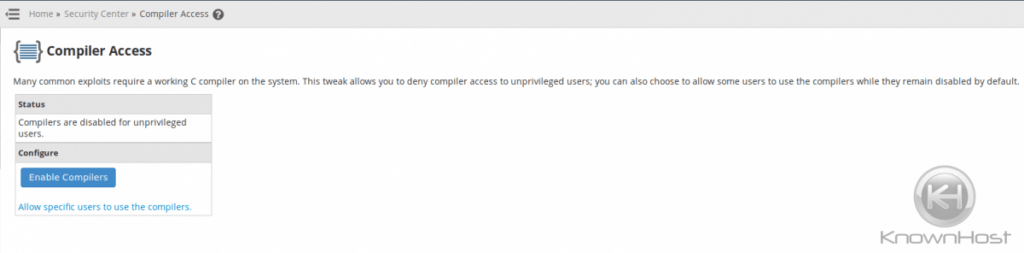
You will see the following interface that will add the user to a compiler group to allow only the group access:
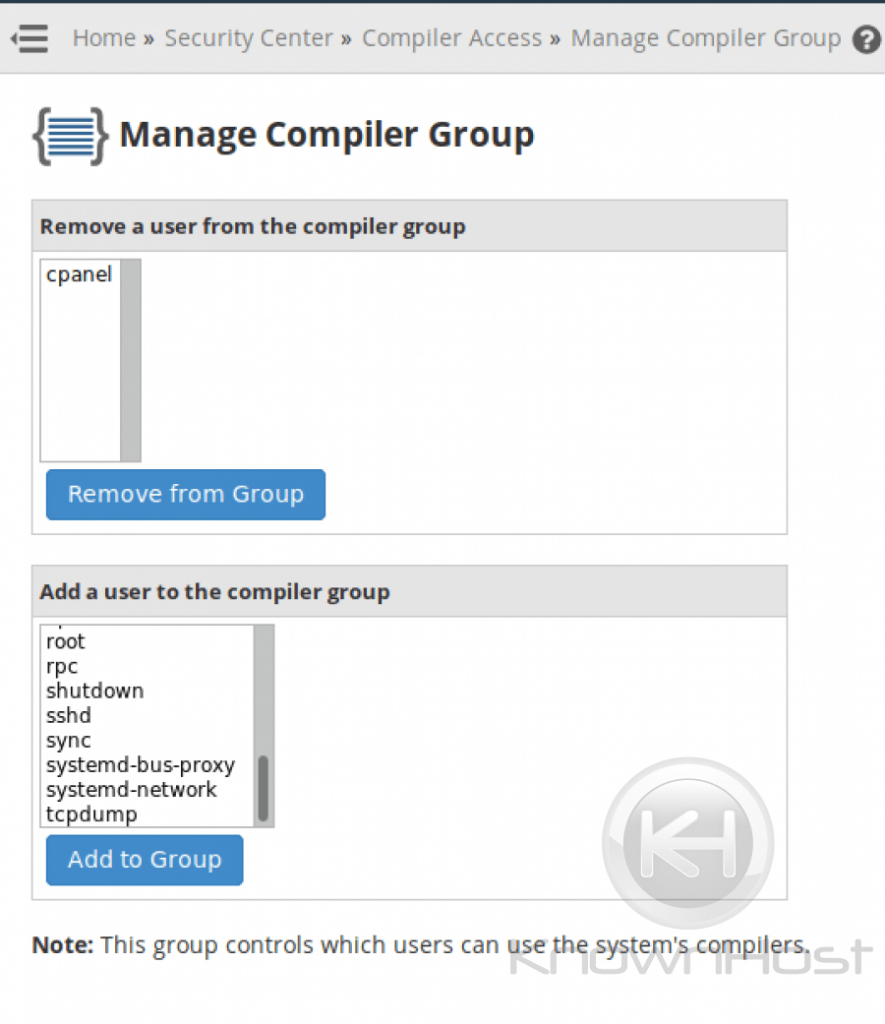
You could run the following commands to enable compiler for a single user if you prefer the command line:
usermod -a -G compiler mycpuser # replace mycpuser with your cPanel usernameNow, su to the user (SSH only):
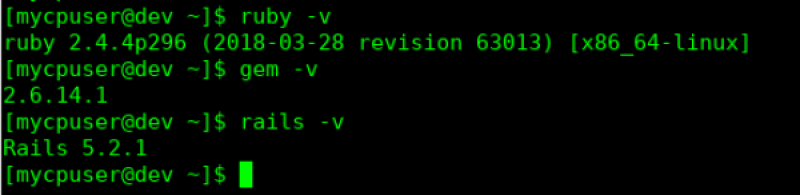
su mycpuserTest ruby and gem commands:
  scl enable ea-ruby24 'ruby -v'
  scl enable ea-ruby24 'gem -v'
You should see the version output from these commands if the installations were successful:

Now, make the installation directory and change into it:
  mkdir ruby_apps
  cd ruby_apps/
If you have tried running the commands ruby, gem, or rails up until now without the scl utility, you would get an error “command not found”. I personally prefer to use the command rails without using the Software Collections Library utility(scl). So, I’m going to add the following to edit my user’s .bashrc as follows:
  echo 'export PATH=$PATH:/opt/cpanel/ea-ruby24/root/usr/bin/' >> ~/.bashrc
  echo 'export PATH=$PATH:/opt/cpanel/ea-ruby24/root/usr/local/bin/' >> ~/.bashrc
  source ~/.bashrc
Now you can see that these commands can be run without the scl utility.
Now, we should make a test Rails application to confirm this is working. Run the following from within the ruby_apps directory:
rails new test_blogYou should see output like this scrolling down the page:
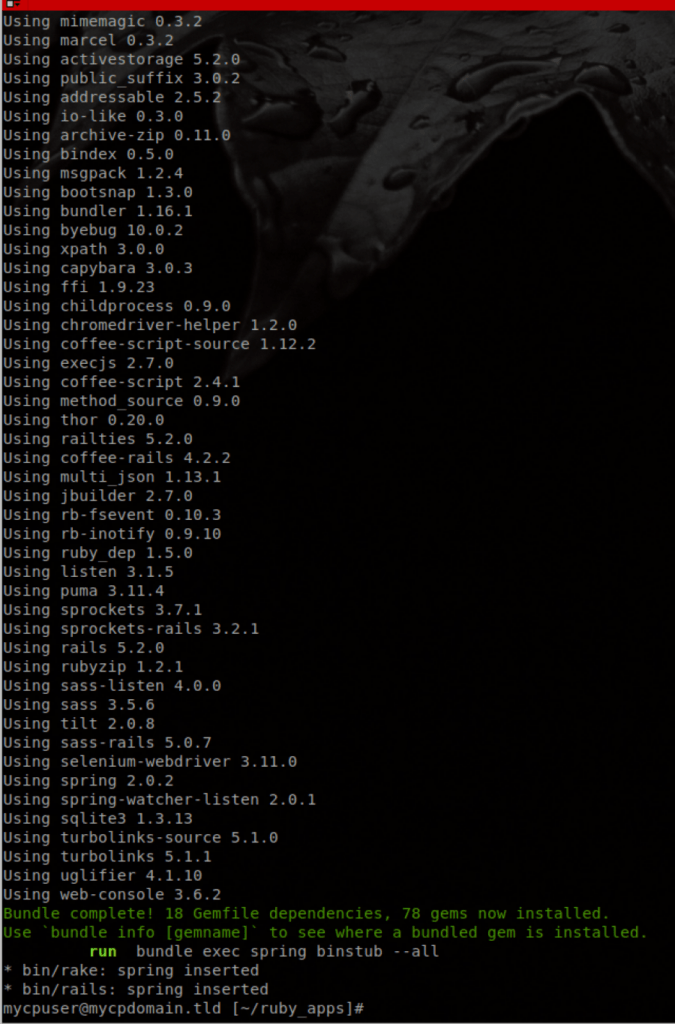
Now, change into the newly generated Rails application and run ‘bundle install’:
cd test_blog
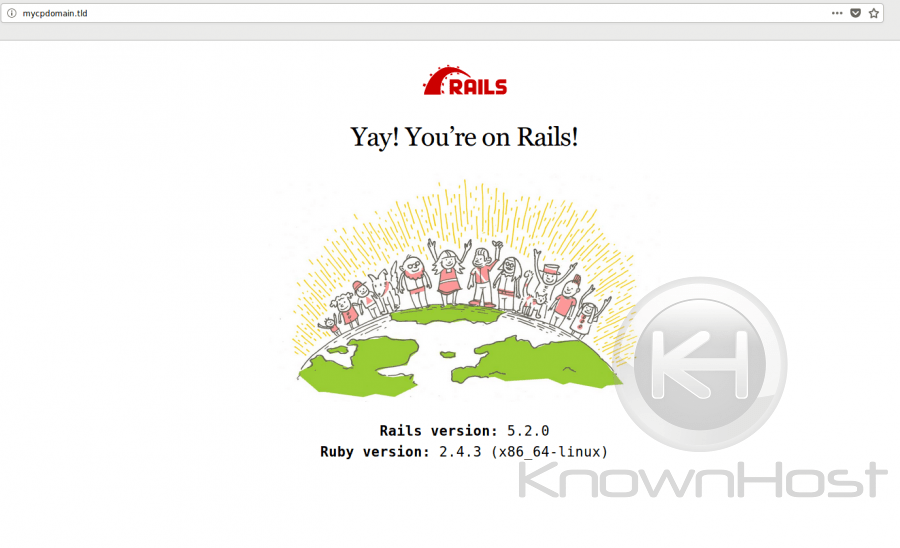
bundle install --path vendor/bundleNow, you should be able to load the Rails default page via the domain in the browser:
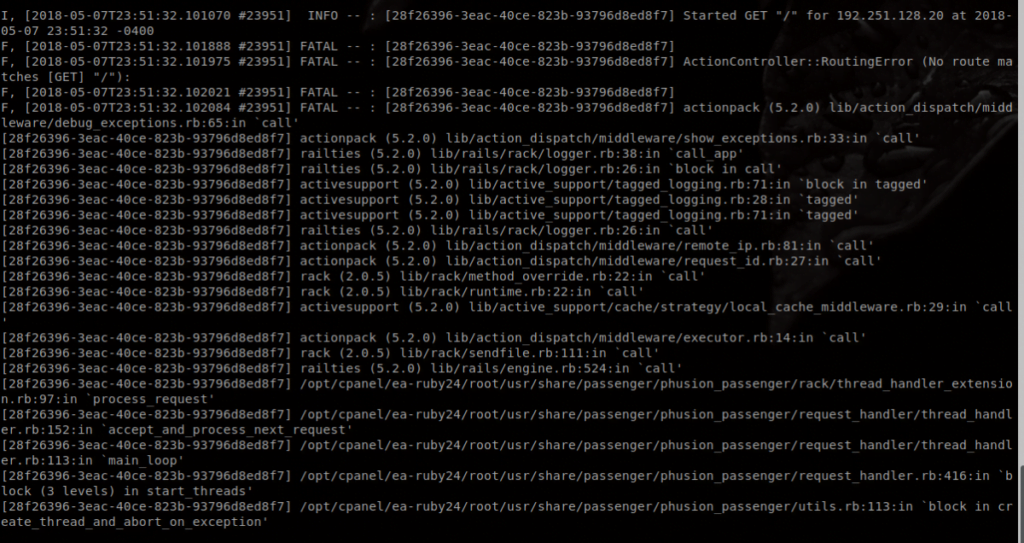
When you created the app via the Application Manager, if you chose Production instead of Development, then you are probably seeing this error:
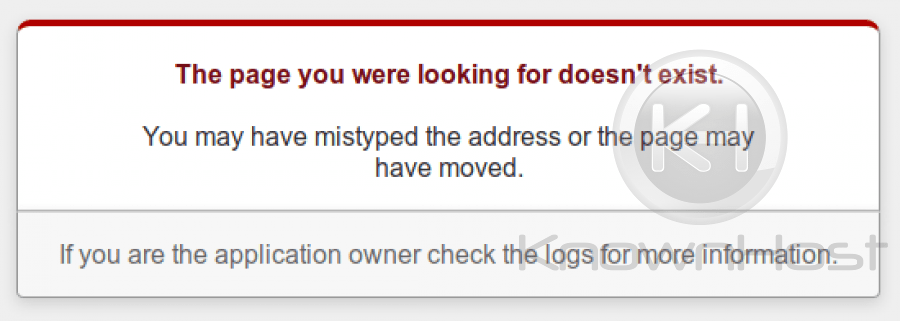
This is because there is no route defined in config/routes.rb. Here is the error as shown in /home/mycpuser/ruby_apps/test_blog/log/production.log:
Now, if you were going to upload a completed Rails application, you would have chosen “Production”, and then the application should work after setting up the gems, database and secret key since it already has routes defined.
Special Considerations
You may want to set up MySQL databases instead of SQLite3, and set them up via the cPanel interface so that they are included in backups and easily managed via cPanel. cPanel will check them for corruption and repair if possible, as well. MySQL is said to be far better for production than SQLite3, too. You would need to create the database, the database user, and the database user’s password, and then give the user permissions to access the database via the MySQL Database Wizard: (cPanel » Home » Databases » MySQL Database Wizard). Make sure to do this for each database you will need (test, development, and production). Be sure to also install the mysql2 gem as root so that it will available to your cPanel user.
Setting up your Rails Application to use MySQL instead is pretty easy. You will need to remove sqlite3 from the Gemfile, install the mysql2 gem, edit the config/database.yml file to use the mysql2 adapter, and restart the Rails application. Alternatively, you could choose to simply specify the database to use at the very beginning using -d mysql with rails new.
Postgresql is another database that you can use with Rails. This database is also supported via cPanel as well. You must install this on your cPanel server first because it is not installed by default like MySQL is. Then, once installed, you will set up a database for your Rails Application, install the pg gem, edit the config/database.yml file to use pg, and restart the Rails application. Just like recommended in the previous section regarding MySQL, you will need to do this for test, development, and production databases. Postgresql seems to be the more common database in use in the Rails community, though MySQL works great, too.