Enable PHP Error Logging for Debug Testing
Last Updated: October 18, 2021
PHP error logging for your site is an optional level of logging that can be enabled to log errors that occur with PHP code. There are several reasons you may choose to enable PHP error logging. You may want to enable PHP error logging if you’re actively developing your site to aid in troubleshooting. If you have encountered the dreaded ‘white page of death’ error (that error that loads a blank page and tells you nothing regarding what is wrong). Or a “500 error” that doesn’t log to the Apache error log as ‘real’ 500 level errors do, then you will need to enable PHP error logging for your site to find the script error. Doing so will cause PHP errors to be logged in the location you choose so that you can determine what is causing the error and work to fix it.
Planning What Settings To Use
You should decide what log settings you need to set before enabling. Most of the time, you will simply choose to have PHP errors logged to a private log in a location that you specify. If the site is not live, then you may also choose to have the errors displayed on the site in the browser. NOTE: Displaying PHP errors on a live site is a security issue so do not enable this setting on a live site! Here are the recommended settings for a live site:
  log_errors = on
  error_log = /path/to/docroot/error_log
  display_errors = off
The recommended settings for a development site that is not live are below:
  log_errors = on
  error_log = /path/to/docroot/error_log
  display_errors = on
Both of the examples shown above do not include an actual path. You may have to create the error_log file, replacing ‘/path/to/docroot/error_log’ with the exact path to the file. I typically place these in the public_html, and then also make a .htaccess rule to prevent unauthorized access to this log. Go ahead and determine what settings you will be using.
Creating the Error Log
Root Access
To create the file under the cPanel user ‘cp_user’, you would do the following as the user root via SSH (the document root for most cPanel-hosted main domains is the public_html):
  cd /home/cp_user/public_html
  touch error_log
  chown cp_user: error_log
Also, be sure that the log can be written to by the user (permissions of 644 should be fine for most KnownHost systems). Do the following to view the file:
ls -lah /home/cp_user/public_html/error_logThe permissions should read as follows if set to 644:
-rw-r--r--cPanel User Access
If you do not have root access and need to make these changes as the cPanel user, there are a few ways you can do this. You can use cPanel’s File Manager, FTP, or SSH if the cPanel user has SSH access. Let’s use the File Manager.
Log into your user’s cPanel account at the following URL (replacing yourdomain.tld with your actual domain):
https://yourdomain.tld/cpanel
Navigate as follows:
cPanel >> Files >> File ManagerClick the File Manager Icon

A new window will open showing the file system. In the top left corner, you will see icons to add files and directories:
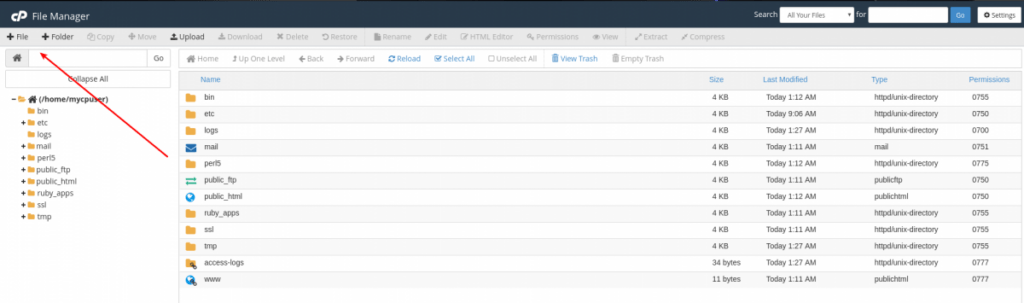
Click the “+ File” button to create a new file. A new dialog box will open. You will input the details of the file to be created here:

Click the button to create the file.
Next, you can use the navigation on the far left to change into the directory that should contain the file to confirm that it was in fact created and has the appropriate permissions.

How to Enable PHP Error Logging
First, you need to decide whether you should enable PHP error logging via a php.ini file or via .htaccess. This will depend on what PHP Handler you are using. To find out what PHP Handler you are using with a cPanel server, run the following as the root user via SSH:
/usr/local/cpanel/bin/rebuild_phpconf --currentIf you are using multiple versions of PHP, you may need to determine what version of PHP your site is using to determine the correct PHP handler.
If you lack root access, you can upload a phpinfo file to your site, and then check it to determine your current PHP Handler. To do so, log into cPanel, navigate to the File Manager, click the button to add a file, name the file phpinfo.php, and add the following content:
<?php phpinfo(); ?>Now, visit your site’s phpinfo.php page in the browser:
https://yoursite.tld/phpinfo.php
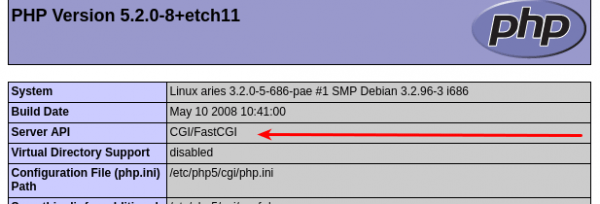
Look for “Server API”. If you see “Apache 2.0 Handler”, then you are using DSO. If you see “CGI/FastCGI” or “CGI”, then you are likely using suPHP, CGI, or FastCGI.
Example: suPHP, CGI, FastCGI will be shown. The “Server API” is near the top of the phpinfo page:
Example: DSO is in use when “Apache 2.0 Handler” is shown next to the “Server API” in the phpinfo page:

suPHP
If you are using suPHP, then you will want to enable logging via the php.ini as shown below (note that you will want to edit display_errors accordingly):
  log_errors = on
  error_log = /path/to/docroot/error_log
  display_errors = off
If the php.ini and error log files do not exist, you will want to create both and make sure to change the ownership of both to the user. The php.ini can be created in the same way as the error_log was as shown in the previous section. If both of these files already exist, then you should make a backup of each before you make any changes. You can make a backup of these files using the cp command as the root user as shown below:
cp -a /path/to/file /path/to/file.backupThis command makes a copy of the file with its current ownership and permissions with the ‘.backup’ extension.
You can accomplish this in cPanel’s File Manager by first selecting the file to make a backup of, and then click the “Copy” icon in the toolbar. Enter the name of the file followed by ‘.bak’ when prompted for the location to copy the file to:
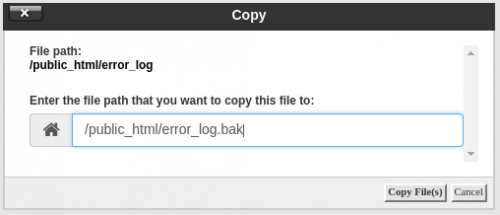
Click “Copy File(s)” and the file will be copied with the new name in the location specified.
After making copies of any existing error_log files and php.ini files, you can proceed to edit them as needed. Since you have a backup of the error_log, you may decide to clear it before you start writing to it again. If so, you can do so with the following command as the root user:
> error_logIf you are using File Manager, just delete and recreate the file.
After you edit the php.ini file with the details above accordingly and create the error log, you should start seeing errors written to the file as soon as they are triggered.
DSO
If you are using DSO, then you will want to enable logging via the .htaccess as shown below using the php_flag and php_value directives:
  php_flag  log_errors on
  php_value error_log  /path/to/docroot/error_log
  php_flag display_errors off
It is also a good idea to make a backup of the .htaccess if one exists before making any changes! You can make a backup of the file using the cp command as the root user as shown below:
cp -a /path/to/file /path/to/file.backupThis command makes a copy of the file with its current ownership and permissions with the ‘.backup’ extension.
You can accomplish this also in cPanel’s File Manager by first selecting the file to make a backup of, and then click the “Copy” icon in the toolbar. Enter the name of the file followed by ‘.bak’ when prompted for the location to copy the file to. Click “Copy File(s)” and the file will be copied with the new name in the location specified. Then you can proceed to edit the .htaccess with the error logging directives noted.
If an error_log already exists, you can make a backup of it as well, then delete it and recreate it with the correct permissions and ownership so that it is empty. To empty the error_log as root, you could just run this command:
> error_logImmediately after making such changes, I always watch the Apache error log and reload the site (just to make sure I didn’t break the site due to a typo or other mistake). To watch the Apache error log, use the following command via SSH as the root user:
tail -f /usr/local/apache/logs/error_logIf any mistakes were made that would adversely affect the site, they would be logged here upon reloading the site (this isn’t a common occurrence, but it is always good to check).
If you don’t have root access, go ahead and just reload the site anyway to ensure it isn’t broken after making these changes. Remember to either clear your browser cache or use a new browser so that browser caching doesn’t affect the results.
Finally, to disable access to your error logs, you can add the following to your .htaccess:
  # prevent access to PHP error log
  <Files error_log>
   Order allow,deny
   Deny from all
  </Files>
Testing Your Changes
You may want to test and ensure that your error log is working as desired, especially if you are troubleshooting an error that only occurs intermittently and you are unable to trigger it on demand. You will want to be sure the error log is effectively logging errors so that you can capture the error when it occurs next. First, create a new PHP script as the root user and give it the correct ownership (change ‘cp_user’ to your cPanel user):
  touch error_logging_test.php
  chown cp_user: error_logging_test.php
Edit the file with the following content:
<?php
   error_log("This is a custom error message constructed to test the php error logging functionality of this site.\n");
?>
Now, watch the error log and load your script in the browser:
tail -f /path/to/docroot/error_logIf your site is my-site.tld, then you will visit my-site.tld/error_logging_test.php in the browser. This should trigger the error defined within the script to be written to the error log that we’ve enabled. You should now see the error appear in the error log if error logging is working properly.
You can do the same as the cPanel user using File Manager. You would create the new file named “error_logging_test.php”, add the content above, and save. You would then test the script by visiting my-site.tld/error_logging_test.php in the browser (replacing my-site.tld with your actual domain). You should now be able to check the error_log and see if the error generated by visiting the script is present. If so, then error logging is working as expected. If not, please open a support ticket and we’ll be glad to help.