What is Memcrashed and how do I fix it?
Memcached
Memcached is a memory object caching system for speeding up dynamic web applications… It’s open source and has been designed to work with a large number of open connections. Database calls, API calls, or page rendering are a few examples of the arbitrary data results that are stored in memory to alleviate database load. One can see why it has been so popular for caching. Its popularity also means that is potential for use as an attack vector is greater simply because it is more available to weaponize.
Memcrashed
A critical vulnerability in Memcached was discovered in February of 2018 that allows attackers to launch and execute powerful DDoS amplification attacks. Learn more about other vulnerabilities This vulnerability has been described as a “new chapter in DDoS attack executions” by Ashley Stephenson, CEO of Corero Network Security. Corero Network Security is the security company that found a ‘kill-switch’ for these attacks. Here is her complete statement:
“Memcached represents a new chapter in DDoS attack executions. Previously, the most recent record-breaking attacks were being orchestrated from relatively low bandwidth Internet of Things (IoT) devices. In contrast, these Memcached servers are typically connected to higher bandwidth networks and, as a result of high amplification factors, are delivering data avalanches to crippling effect. Unless operators of Memcached servers take action, these attacks will continue.” www.corero.com/blog/corero-network-security-discovers-memcached-ddos-attack-kill-switch-and-also-reveals-memcached-exploit-can-be-used-to-steal-or-corrupt-data/
This vulnerability was dubbed “Memcrashed” by Cloudflare and is responsible for a 1.35 Tbps DDoS that hit Github February 28, 2018, February 28th DDoS Incident Report
A few different PoC exploit codes have been released, one of which utilizes the Shodan search engine API to obtain a fresh list of vulnerable Memcached servers each time. The Shodan engines show 29,411 servers still unpatched as of June 16th, 2018.
Memcached DDoS Exploit Code and List of 17,000 Vulnerable Servers Released
MEMCRASHED DDOS EXPLOIT TOOL(GitHub)
We’ve done a great job taking care of this threat overall as a community, but there is still work to be done. Many reports were previously reporting approximately 95,000 to 100,000 vulnerable servers. We must remain proactive in identifying these servers and securing them!
Getting Amp’d
Why is this type of attack such a big deal? Because of the immense bandwidth amplification factor, or BAF, which is the potential effect of an amplification attack. A BAF can be calculated as the number of UDP payload bytes that an amplifier sends to answer a request, compared to the number of UDP payload bytes of the request.
“15 bytes of request triggered 134KB of response. This is an amplification factor of 10,000x! In practice we’ve seen a 15-byte request result in a 750kB response (that’s a 51,200x amplification),” Cloudflare says. Memcrashed – Major amplification attacks from UDP port 11211
Some other popularly known DDoS amplification attack vectors include poorly secured DNS resolution servers and network time protocol, or NTP. Looking at these and a few others below, you will see each listed with its corresponding BAF:
| DDoS Amplification Attack Vector | Bandwidth Amplification Factor |
| DNS | 50 |
| NTP | 58 |
| Portmap (RPCbind) | 28 |
| LDAP | 55 |
| Memcached | 51,000 |
These numbers make it incredibly easy to understand why Memcrashed is worrisome and potentially devastating for those that have not secured against it.
Memcrashed “Kill-Switch” and Data Theft and/or Corruption
While Corero Network Security, a DDoS & Network Security Solutions provider, was investigating this issue, they discovered a ‘kill-switch’ that they claim has been tested on live attack servers and has been 100% effective. The memcached “flush_all” command will invalidate the cache. If memcached is reloaded before the vulnerability patch is applied, then the “kill-switch’ will be necessary again. The command should be sent to the originating attack servers, with a single ‘flush_all’ command issued to each attacker.
Unfortunately, while discovering the ‘kill-switch’, the team at Corero also found that this vulnerability is even worse than previously thought. This is mainly due to the way UDP and memcached functions.
The Memcached protocol was designed to be used without logins or passwords, meaning that anything you add to a vulnerable Memcached server can be stolen by anyone on the internet, without a login, password or audit trail. By using a simple debug command, hackers can reveal the ‘keys’ to your data and retrieve the owner’s data from the other side of the world. Additionally, it is also possible to maliciously modify the data and reinsert it into the cache without the knowledge of the Memcached owner.
Despite repeated warnings by the Memcached developer community and large IT vendors about security risks, default configurations for some of the latest operating systems and cloud computing services still allow ubiquitous access to the Memcached service and customers’ private data.
There are several ways to flush Memcached. I prefer Telnet, so here is the sequence of commands you would use to accomplish this:
  telnet memcached-server-ip PORT
  flush_all
  quit
Where: memcached-server-ip = Your server’s IP PORT = equals the memcached port, which is usually 11211
NOTE: Make sure you apply the patch and then restart Memcached:
service memcached restartWhat Can I Do?
Memcached developers have patched this memcached patch notes, but if you are running a version of Memcached older than version 1.5.6, you must either update or apply the required configuration changes yourself.
If you are concerned about your Memcached installation, please don’t hesitate to open a ticket with Knownhost support so we can check the version and patch/upgrade if necessary.
How Can I Secure My Memcached Installation By Editing the Existing Configuration?
For those of you that would rather do so yourself, here are instructions for recognizing the vulnerability and securing against it.
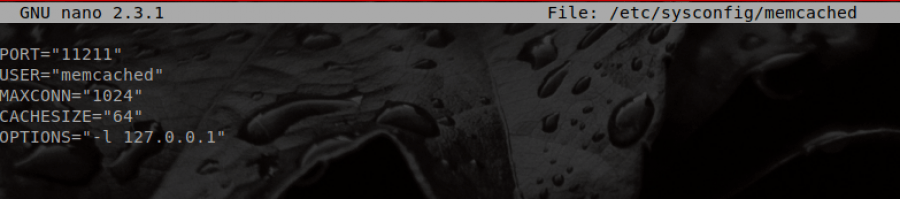
First, check to see if your memcached is vulnerable. You can do by checking to see if the configurations either closes UDP or binds to localhost. Below, we first see an insecure instance of Memcached:

Since Memcached versions prior to 1.5.6 listen on INADDR_ANY and run with UDP support enabled by default, versions older than 1.5.6 are vulnerable. Version 1.5.6 secures this by completely disabling the UDP protocol for default installations.
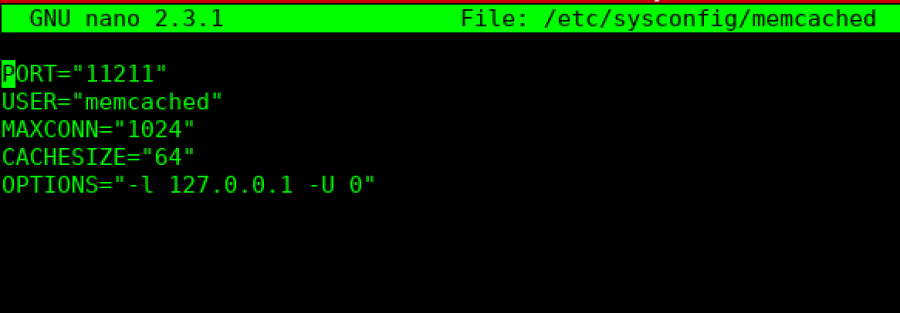
To secure older, vulnerable Memcached software, you can completely disable UDP if not in use or bind Memcached to a local interface only. Binding the IP to localhost can be done by modifying /etc/sysconfig/memcached and adding “-l 127.0.0.1” to the ‘OPTIONS’ list. You would specify “-U 0” to disable UDP.
To secure Memcached by binding it to the localhost, you must edit its configuration file. The file reads as follows in default installations prior to version 1.5.6:

Now compare the image below after I’ve bound Memcached to localhost:
Restart Memcached:
service memcached restartCheck the process now:

We also need to make sure that port 11211 is closed in the firewall:

This shows that all incoming and outgoing UDP/TCP ports are closed for port 11211.
A better solution would be to disable UDP, and the best solution would be to disable UDP as well as bind to localhost. This is what I’ve done below:
Here is the insecure memcached installation:

The following shows where I’ve edited the file to set both options:
After restarting memcached with the command ‘service memcached restart’, I can see that my Memcached installation is secured because it is only listening on localhost and UDP is disabled:

My running memcached process shows all options set that indicate that the daemon is secured:

TCP is not currently considered a high-risk Memcached amplification vector because TCP queries are far less vulnerable to spoofing than UDP queries due the fact that you would also need to spoof TCP header fields relating to the state of the connection. Sending a spoofed TCP packet requires the attacker to guess the sequence number, which cannot be done reliably.
Why TCP is more secure than UDP?
Installing and Securing Memcached for EasyApache 4 CentOS 7/CPanel Servers: Everything You Need to Know
At the time of writing this article, installing memcached via yum installs an outdated version. I’ll show you how to install it, check the version, and if necessary, secure the installation here. We will also add it to cPanel’s Service Manager so that the service will be restarted upon reboot and we will also configure the firewall to ignore the false positive alerts that it will send about this foreign process that it does not recognize as legitimate (we know its legitimate because we installed it and configured it to be safe ).
First, log into your server via SSH as root (reminder: the default Knownhost SSH port is set to 2200):
ssh root@<IP> -p2200Now, install memcached:
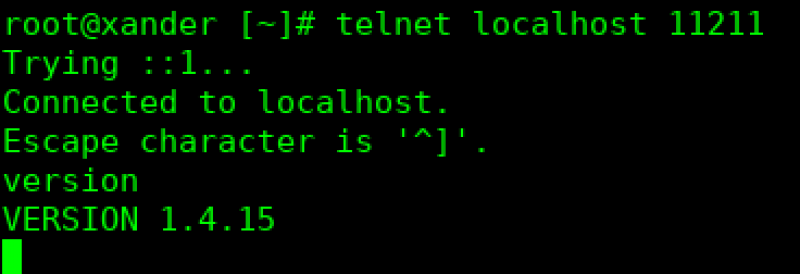
yum install memcachedNow, to check to see what version is installed by using telnet as shown in the screenshot below using the command “telnet localhost 11211”. Once connected, type ‘version’ and press Enter, and the Memcached version will be returned. If the version is less than 1.5.6, then you will need to secure your memcached installation following the steps below.
Now, to secure the installation, use nano to edit the file /etc/sysconfig/memcached:
nano /etc/sysconfig/memcachedYou will change the following line:
OPTIONS=""To this:
OPTIONS="-l 127.0.0.1 -U 0"And then Ctrl X + y +Enter to exit and save the file.
Now, start memcached.:
service memcached startAdd memcached to the Service Manager so that it will be monitored and restarted as needed (following reboots, etc):
chkconfig memcached onLastly, we need to make sure that the CSF/LFD firewall that is installed by default with Knownhost servers is configured appropriately. Port 11211 should not be opened in the firewall by default, but it never hurts to check:
grep 11211 /etc/csf/csf.confIf you get no output, then the port is not open. It only needs to be accessible locally, so the port should be closed.
Next, we need to edit the firewall’s process ignore file so that the firewall won’t send us alerts about this newly added process. Open the process ignore file with nano:
nano /etc/csf/csf.pignoreScroll to the bottom of the file and add either of these (use the executable option if you are likely to adjust the configuration of your installation, or be prepared to edit the cmd option in the firewall’s process ignore file when you do):
  exe:/usr/bin/memcached
  cmd:/usr/bin/memcached -u memcached -p 11211 -m 64 -c 1024 -l 127.0.0.1 -U 0
Exit with Ctrl X + y + Enter and restart the firewall so that these changes take effect:
csf -raThat’s it! Enjoy your secured Memcached installation!
Note: If you also require the Memcache PHP extension, you can use the following command for EasyApache 4, however, you will need to replace ## with the PHP version that you intend to install it for:
/opt/cpanel/ea-php##/root/usr/bin/pecl install memcacheUse the following command to confirm the installation (again, replacing ## with the PHP version required, e.g., 54, 55, 56, 70, 71, etc):
/opt/cpanel/ea-php##/root/usr/bin/php -m | grep memcacheAs always, if you have any questions or any trouble with this installation on your Knownhost server, please open a support request and we’ll be glad to help!
cPanel and Memcached
Note that cPanel has memcached and memcache RPMs in their experimental EasyApache 4 repos at this time. cPanel preview. These are not yet secured via SASL authentication, but the statement in their Feature Request seems to indicate that they plan to use SASL to secure Memcached. You may want to watch for these to be moved into the stable repo so that you can replace your Memcached installation with a cPanel-supported installation when that time comes. Until then, make sure to either use a later version of Memcached, or to open a ticket with Knownhost so that we can secure it for you.